
Table of Contents
- What Type of Outdoor Lighting Works Best in Des Peres?
- Design for Both Summer Foliage and Winter Visibility
- Evaluate Lighting from the Places People Actually Use
- Choose Color Temperature and Beam Spread Together
- How Many Lights and How Much Transformer Capacity Do You Need?
- Select Fixtures for Their Actual Exposure
- Check Des Peres Lighting Rules Before Ordering Equipment
- What Determines Outdoor Lighting Costs in Des Peres?
- Plan the Installation in Six Steps
- Maintain the Lighting as the Landscape Changes
- Build a Nighttime View That Works Throughout the Year
- FAQs
Outdoor lighting in Des Peres should make arriving home easier, reveal the character of your house, and create comfortable spaces after sunset. A successful design also needs to work through summer foliage, autumn leaf fall, winter weather, and changing views between neighboring properties.
That seasonal change deserves more attention than it usually receives. A spotlight concealed behind leaves in July can become visible from a bedroom window in December. A path light that looks comfortable on dry concrete can create distracting reflections after rain.
For homeowners planning Des Peres outdoor lighting, the strongest starting point is a coordinated system of warm LED fixtures, controlled light distribution, and separate schedules for different activities. Fixture quantity comes later, once you understand where light needs to land and who will see it.
What Type of Outdoor Lighting Works Best in Des Peres?
For garden paths, planting beds, and selected architectural features, a properly designed low-voltage LED system offers useful flexibility. Fixtures can be positioned around the landscape, grouped into zones, and adjusted as plants mature.
Existing line-voltage wall fixtures can continue serving entrances and other appropriate locations. Solar lights can suit sunny decorative areas, although their performance depends on the sunlight reaching the panel and the condition of the battery. Comparing solar and low-voltage outdoor lighting helps identify where each approach fits.
Start by assigning a specific purpose to each area:
| Area | Main lighting objective | Design priority |
|---|---|---|
| Front entrance | Make the doorway, landing, and approach easy to recognize | Comfortable visibility of people and changes in level |
| Walkway | Reveal the walking surface and its direction | Controlled coverage without exposed bright sources |
| Steps | Make tread edges and landings distinguishable | Light reaching the surface from a useful angle |
| House façade | Establish an architectural focal point | Selective illumination with controlled spill |
| Patio | Support conversation and movement | Comfortable light at seated eye level |
| Trees and planting beds | Add depth to the nighttime view | Beams contained within selected features |
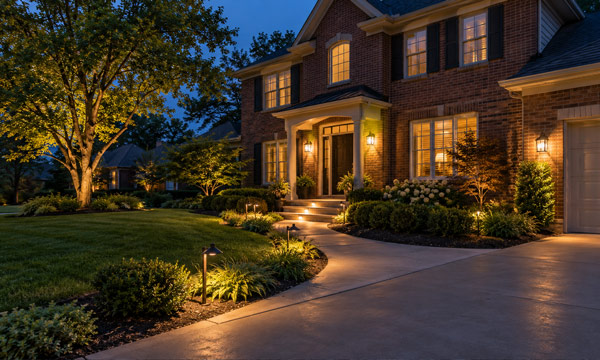
Layered outdoor lighting for Des Peres homes combines warm LED path lights, illuminated steps, and welcoming entrance fixtures.
This approach gives every fixture a job. It also makes future adjustments easier because you can evaluate whether each light still serves its original purpose.
Design for Both Summer Foliage and Winter Visibility
A landscape lighting plan needs to account for the yard’s changing shape throughout the year.
Check where beams travel after leaves fall
Deciduous foliage can intercept light and conceal fixtures during the growing season. Once leaves disappear, the same installation may send light through branches toward neighboring windows or open sky.
When planning tree lighting, examine the entire beam path. Consider what lies behind the trunk and canopy, particularly on sloping ground or near a property boundary.
A useful design exercise is to imagine the tree without leaves before approving its summer appearance. Adjustable aiming, appropriate shielding, and a separate control zone can make seasonal corrections easier.
Avoid relying on vegetation as the only barrier controlling light spill.
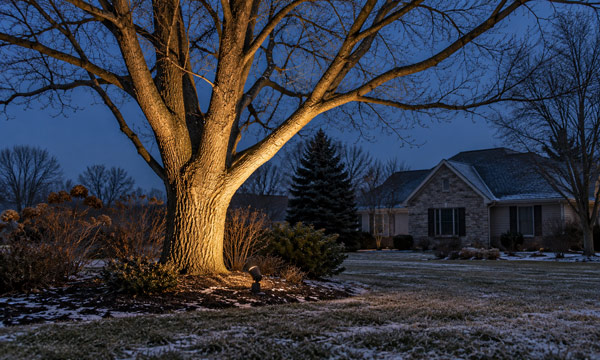
Carefully aimed tree uplighting highlights bare winter branches while keeping light directed away from neighboring windows.
Include a wet-weather review
Rain changes the appearance of paving, steps, and driveways. Reflections may reveal a bright source that was barely noticeable during a dry-weather demonstration.
After installation, review the entrance and main walking route following rain, when conditions are safe. Look from the driveway, the doorway, and the direction guests normally approach.
If a reflection becomes distracting, first examine fixture position and aiming. A small adjustment may improve comfort while preserving useful light on the walking surface.
Allow for landscape maintenance and winter work
Place fixtures where ordinary property maintenance will leave them accessible and stable. Consider mower routes, string trimming, leaf collection, snow removal, irrigation, and areas where water accumulates.
After winter, inspect stake-mounted fixtures for movement and check whether mulch or soil now covers lenses, drainage openings, or components that should remain exposed.
These details influence long-term performance as much as the fixture’s initial appearance.
Evaluate Lighting from the Places People Actually Use
A view from the street shows only part of the result.
Before finalizing a layout, review it from three practical positions:
- The arrival route: Approach from the driveway or garage and follow the route to the door.
- Outdoor seating: Sit in the chairs people will use and check whether any bright source faces their eyes.
- Inside the house: Look through the windows used most often in the evening, with normal indoor lighting switched on.
The indoor view is especially useful. Selectively illuminated planting or a tree can create depth beyond the glass, while an exposed spotlight can become an uncomfortable point of brightness.
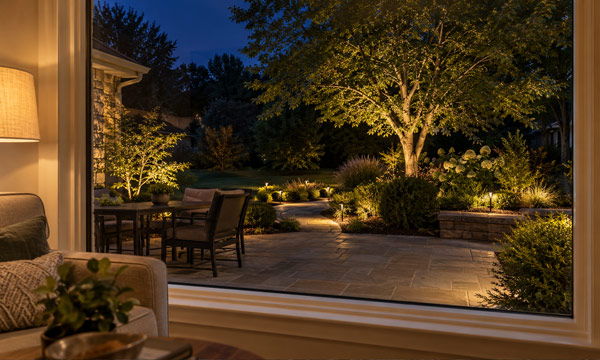
Selectively illuminated trees and planting beds create depth in the nighttime garden when viewed from inside the home.
Also inspect the property boundary from your own side. Any beam directed toward a neighboring window deserves adjustment.
The underlying principle is straightforward: light should have a defined purpose, reach the intended area, and operate at a level and time appropriate to that purpose. Shielding and careful aiming help achieve this.
Choose Color Temperature and Beam Spread Together
Color temperature influences how the landscape feels. Beam distribution determines where that light goes.
Establish a consistent warm-white appearance
For a residential landscape, 2700K is a useful starting point for a warm nighttime appearance. A 3000K sample may also suit particular materials or homeowner preferences.
Test the options on the actual brick, stone, siding, and planting before selecting the whole system. The comparison between 2700K and 3000K landscape lighting is most useful when viewed on the surfaces being illuminated.
Keep the arrival sequence visually coherent. A porch fixture, nearby path lights, and an accent light are often seen together, so an accidental mixture of noticeably different whites can distract from the house.
Match the beam to the target
A narrow architectural feature and a broad planting bed require different distributions. Understanding spotlight beam angle helps match coverage to the target and mounting distance.
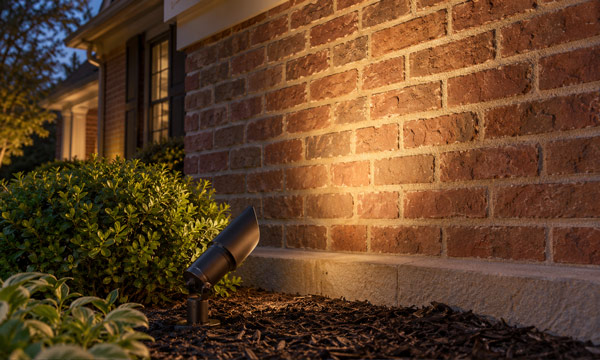
A carefully aimed warm-white spotlight reveals brick texture with controlled coverage and a soft lighting gradient.
For tree lighting, check whether the beam remains within the intended trunk or canopy. For masonry, test whether the fixture reveals texture or creates an excessively bright patch.
Choose output and beam shape together. Lumens describe the amount of light produced, but they do not fully describe how effectively a fixture illuminates a particular surface.
How Many Lights and How Much Transformer Capacity Do You Need?
Fixture count should follow the layout. Electrical sizing then determines whether the proposed system can support that layout reliably.
Consider this hypothetical low-voltage installation:
| Fixture group | Quantity | Actual power per fixture | Combined load |
|---|---|---|---|
| Path lights | 8 | 3 watts | 24 watts |
| Accent lights | 4 | 5 watts | 20 watts |
| Step lights | 4 | 2 watts | 8 watts |
| Total | 16 | — | 52 watts |
The calculation is:
Total fixture load = quantity × actual watts for each fixture type, added together.
This example produces a 52-watt fixture load. It does not establish the transformer size, cable size, or household circuit requirements by itself.
Check transformer compatibility
A compatible 100-watt transformer could be a candidate for this example, subject to its instructions, output limits, and the connected equipment.
Verify:
- Output voltage and whether the fixtures require AC or DC.
- Fixture wattage or volt-ampere requirements, as specified.
- Total and individual output-circuit limits.
- Any manufacturer-required operating margin.
- Compatibility with timers, photocells, and other controls.
If equipment is rated in volt-amperes, use the relevant VA information when checking capacity. Avoid assuming that all products with similar wattage labels are interchangeable.
Design cable runs separately
Two systems with the same total fixture wattage can perform differently when one has short cable runs and the other places a large load far from the transformer.
Cable length, conductor size, current, and fixture distribution affect voltage drop. Use a landscape lighting wire size guide as a planning aid, then verify the design against the equipment specifications.
For a property with distinct front and rear areas, separate runs can simplify load distribution and troubleshooting.
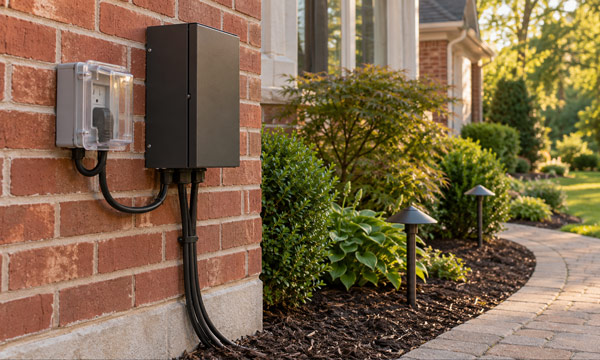
An outdoor transformer supplies low-voltage landscape lights through neatly routed cables, with the household power connection protected by a weatherproof cover.
Evaluate the household supply independently
The low-voltage fixture load and the transformer’s household-side input are separate considerations. An electrician should assess the transformer input rating, other loads sharing the circuit, and the ratings of the supply equipment and controls.
A transformer’s advertised output capacity is not its constant electricity consumption.
Select Fixtures for Their Actual Exposure
Weather suitability applies to the complete installation: fixtures, power equipment, cable entries, connectors, and mounting arrangements.
An ingress-protection rating describes resistance to dust and water under defined test conditions. Outdoor electrical suitability also involves the applicable product evaluation and intended installation location. Check the product’s approved use and installation instructions alongside its IP rating.
On a Des Peres property, examine exposure location by location:
- An uncovered wall fixture receives different weather exposure from one beneath a deep porch.
- A fixture in a low planting bed may experience runoff or standing water.
- An in-ground light needs an installation arrangement appropriate to drainage and soil conditions.
- A connector near irrigation requires protection suitable for that environment.
An IP marking alone does not establish suitability for submersion or direct burial.
Also consider access. A fixture installed behind dense shrubs may be difficult to aim, clean, or service once the planting matures.
Check Des Peres Lighting Rules Before Ordering Equipment
Local requirements can affect the design before electrical installation begins.
Section 406.030 addresses exterior lighting. The city’s published zoning language restricts colored exterior building illumination, with an exception for temporary decorative lighting associated with traditional holiday seasons. An amendment approved in 2021 also prohibited lighting for sports courts and similar facilities in residential zoning districts. Confirm the current requirements and their application to your property before purchasing equipment for either use.
City of Des Peres. (2021, July 12). An ordinance of the City of Des Peres amending Section 406.030 of the Zoning Code to prohibit sport court lighting in residential areas (Ordinance No. 2901).
Electrical permitting involves a separate review. Des Peres directs electrical permit applications through St. Louis County. Confirm the requirements for the proposed scope, particularly when adding a receptacle, household circuit, or hardwired equipment.
Review applicable subdivision restrictions or association requirements as well. These may affect fixture appearance, placement, or project approval.
What Determines Outdoor Lighting Costs in Des Peres?
An installed price depends on the work required to achieve the design.
Major variables include fixture construction, cable routing, access beneath hard surfaces, transformer and control requirements, electrical supply work, and the time allocated to nighttime adjustment. These factors explain why landscape lighting installation costs vary between properties.
When comparing proposals, look for a defined scope that identifies:
- Fixture types, locations, and intended effects.
- Cable specifications and proposed routes.
- Transformer capacity and control zones.
- Required electrical work.
- Nighttime aiming and homeowner review.
- Warranty coverage and service arrangements.
The nighttime review deserves its own place in the scope. It is the point at which glare, missed steps, unwanted spill, and uncomfortable sightlines become visible.
Estimate operating cost using input power
Suppose an illustrative system consumes 65 watts at the household supply and operates for six hours each night:
65 ÷ 1,000 × 6 × 30 = 11.7 kWh per month
At an assumed electricity price of $0.15 per kWh:
11.7 × $0.15 = approximately $1.76 per month
This is an example, not a Des Peres electricity-rate quotation. Use the system’s actual input consumption, operating hours, and your electricity rate for a useful estimate.
Plan the Installation in Six Steps
1. Walk the property after dark
Follow everyday routes and identify the places where visibility changes abruptly. Record steps, turns, landings, and entrances that need attention.
2. Choose a few visual priorities
Select the architectural or landscape features that matter most. Establish how they relate to the entrance and the view from inside the house.
Leaving some areas unlit can preserve depth and make the selected features easier to appreciate.
3. Map power and cable routes
Locate the proposed transformer, supply point, and fixture groups. Arrange utility locating and identify private underground systems before digging.
Consider future planting work and access for repairs.
4. Test fixture positions
Where practical, use a temporary lighting demonstration before permanent installation. Adjust beam direction, shielding, and output while the fixtures remain easy to move.
A thoughtful low-voltage garden lighting installation includes checking the effect before completing the cable installation and landscape restoration.
5. Review the finished system at night
Walk the arrival route, sit on the patio, and inspect the indoor view. Check the first and last fixtures on each run for consistent operation.
Make final adjustments with the complete system operating, since nearby fixtures influence the overall appearance.
6. Keep a simple system record
Save a layout showing cable routes, fixture locations, transformer outputs, and control settings. Record fixture specifications and take photographs of the approved nighttime aiming.
These records are useful when landscaping changes or a component requires service.
Maintain the Lighting as the Landscape Changes
A practical maintenance schedule follows seasonal changes.
In spring, inspect fixture alignment, exposed components, and areas affected by winter movement. During the growing season, check whether foliage blocks useful light. After leaf fall, review beams that may now reach beyond their intended targets.
Regular cleaning of garden lights also helps preserve the intended output. Disconnect power and follow the manufacturer’s cleaning instructions.

Cleaning the lens of a powered-off landscape spotlight removes dust and pollen that can reduce useful light output.
Watch for patterns when problems develop. A single dark fixture may indicate a local component or connection issue. Several fixtures behaving differently along one run may justify checking the cable and delivered voltage.
Repeated protective-device trips, damaged wiring, or water inside electrical equipment require professional attention before the system is returned to service.
Build a Nighttime View That Works Throughout the Year
The strongest Des Peres outdoor lighting plan connects practical visibility with a comfortable view of the property.
Begin with the routes people use. Choose a few architectural and landscape priorities. Check the design from inside the house, account for bare branches and wet surfaces, and size the electrical system around the actual equipment and cable routes.
A design reviewed under these conditions is better prepared to remain useful as the weather, planting, and household routines change.
FAQs
1. Can outdoor lighting interfere with security-camera night vision?
Yes. A fixture shining toward a camera can create glare, while light reflecting from nearby surfaces can reduce image clarity. Infrared light can also reflect from objects close to the lens.
Test recorded footage with the outdoor lights operating. Adjust the offending light or camera position as appropriate, and inspect the lens or dome for dirt and moisture before increasing illumination.
2. What outdoor lighting attracts the fewest insects?
Insect response varies by species and light spectrum. Yellow-toned lighting can attract fewer insects than some other sources, although it does not eliminate them.
For a residential installation, consider lighting that attracts fewer insects alongside local color restrictions. Shield the source, limit unnecessary operating hours, and place fixtures so insects gathering around them are less likely to concentrate beside doors or seating. Lighting selection does not replace mosquito-control measures.
3. Can I convert existing outdoor fixtures to LED without replacing them?
Often, provided the fixture remains in suitable condition and the replacement bulb meets its requirements. Check the base, supply voltage, physical fit, weather suitability, and any dimmer or transformer compatibility.
For enclosed fixtures, select a bulb approved for enclosed operation because trapped heat affects operating conditions. Before using LED bulbs in existing fixtures, inspect the socket, seals, and housing as well. A bulb replacement cannot correct deterioration in the fixture itself.
4. Can landscape lighting be installed around a swimming pool or hot tub?
It can form part of a professionally designed installation, but ordinary garden-lighting suitability does not automatically establish suitability near a pool or spa.
Have a qualified electrician specify appropriate equipment, placement, and any required electrical protection, grounding, or bonding. Wet surfaces increase electrical risk, so pool-area lighting needs particular care. Keep temporary cords and improvised lighting arrangements away from the water.
5. Are integrated LED fixtures or replaceable-bulb fixtures better for long-term ownership?
Compare how each fixture can be repaired. A replaceable-bulb design may make routine light-source replacement straightforward. An integrated design may offer compact construction and carefully matched optics, but service could involve replacing a module, driver, or complete fixture.
Before buying, check available replacement parts, access to serviceable components, and warranty terms. The most useful choice is one whose maintenance requirements fit the fixture’s location and the parts support available over time.
