Contents
- How a typical solar garden light works (fast primer)
- The real reasons they don’t last
- Two-minute triage (quick diagnostics)
- Common causes, tell-tale symptoms, and fixes
- Battery chemistries at a glance
- Make your current lights last longer (practical steps)
- Buying smarter next time
- Setting expectations with a little math
- FAQs
Solar stake lights promise “free” ambiance with zero wiring—stick them in the ground and let the sun do the rest. Yet many people discover that the glow fades after a few weeks, or entire fixtures die after a season. The problem isn’t that “solar doesn’t work”; it’s that garden lights operate on a razor-thin energy budget, live outdoors in harsh conditions, and are often built to a price rather than a spec. This guide explains the engineering realities behind short lifespans, how to diagnose the weak link in your lights, and what to buy (or upgrade) so they shine for years.

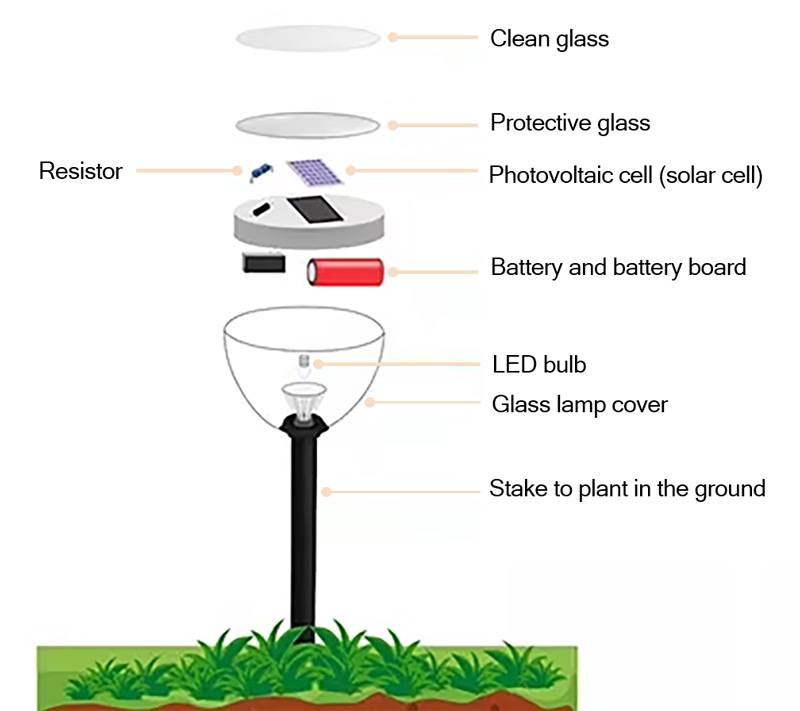
How a typical solar garden light works (fast primer)
- Solar panel converts daylight to electricity.
- Charge controller (often a single chip) routes that energy into a small battery and flips the light on at dusk using a light sensor.
- Battery stores a tiny amount of energy—commonly one AA/AAA NiMH cell, a small Li-ion, or a LiFePO4 pack.
- LED + driver turns stored energy into light.
- Housing tries to keep water and dirt out, but gaskets, lenses, and seams are frequent failure points.
- Every one of these parts can be undersized or stressed, which is why many lights falter.

The real reasons they don’t last
1) Marginal energy budget
Marketing claims often assume noon-sun lab conditions. In a yard, trees, eaves, and seasonal low sun angles slash charge. A 50×50 mm panel might deliver only 0.6–1.2 Wh on a good day after losses. If the LED draws 0.25–0.5 W, you’ll get 2–4 hours of bright output at best, less in winter or shade. The result is a nightly “early fade” that users interpret as failure.
What to do: favor larger panels (or remote panels that sit in full sun), lower brightness, and products that publish panel watts and battery watt-hours (Wh), not just “mAh.”
See also: “A solar lighting system will work well only as long as the solar cells receive the manufacturer's recommended hours of sunlight.” — U.S. Department of Energy – Outdoor Solar Lighting
2) Weak or inappropriate batteries
Many lights ship with cheap cells that lose capacity quickly. Deep discharge, summer heat, and winter cold accelerate wear. Some controllers even charge Li-ion cells below 0 °C—damaging them permanently.
What to do: replace with brand-name NiMH low self-discharge (LSD) AAs/AAAs if that’s your form factor, or LiFePO4 (3.2 V) if the light is designed for it. Choose lights with replaceable batteries and published chemistry.
3) Water ingress and corrosion
An IP44 sticker isn’t magic. Temperature swings pull moist air inside, condensation forms, and soon battery tabs, springs, and PCBs corrode. UV degrades seals over time.
What to do: open and dry, clean corrosion with isopropyl alcohol, add a dab of dielectric grease to contacts, reseal gaskets, and drill a tiny weep hole at the housing’s lowest point so moisture can escape. Prefer IP65+ housings and glass-covered panels.
4) Primitive charge/discharge electronics
To keep costs low, many lights use a minimalist “all-in-one” controller. Common omissions: low-voltage cutoff, temperature-aware charging, and constant-current LED drivers. That means batteries are over-depleted, LEDs run inconsistently, and the system ages fast.
What to do: choose models that specifically advertise constant-current drivers, LiFePO4 support, and low-voltage protection. DIYers can upgrade the driver in robust housings.
5) Heat, cold, and UV
- Heat inside a sealed head accelerates battery and LED wear.
- Cold slashes usable capacity; both NiMH and Li-ion suffer below freezing.
- UV yellows plastic lenses and panel encapsulant, reducing both light output and charging.
- What to do: use glass lenses and glass-covered panels, provide airflow (avoid tucking heads under hot eaves), and store lights during deep freezes if your winters are harsh.
6) Dirt and shade
A dusty panel can lose 10–30% of output; a slender afternoon shadow can cut charging when it matters most.
What to do: clean panels monthly and trim foliage. Aim the panel toward true south (north in the Southern Hemisphere).
7) Mechanical weak points
Brittle stakes, thin wiring without strain relief, and tiny slide switches frequently fail.
What to do: choose metal stakes, robust threads and gaskets, and, if needed, reinforce cable exits with heat-shrink. Bypass flaky switches.
Two-minute triage (quick diagnostics)
- Cover the panel in daylight: the LED should try to turn on—proves the light sensor path works.
- Swap the battery with a known-good, fully charged, same-chemistry cell. If runtime rebounds, the original cell is done.
- Clean the panel with a damp microfiber cloth (no abrasives).
- Inspect for corrosion; brighten contacts with a fiberglass pen, wipe, then coat lightly with dielectric grease.
- Test in full sun for a day. If runtime is still poor, your panel is undersized for your brightness—dim it or consider a remote panel.
Common causes, tell-tale symptoms, and fixes
|
Cause |
Typical Symptoms |
Quick Check |
Best Fix / Upgrade |
|---|---|---|---|
|
Undersized panel |
Bright at dusk, fades in 30–90 min; worse in winter |
Compare to a neighbor in full sun; measure runtime after a sunny day |
Buy lights that publish panel watts; add a remote 1–3 W panel; use motion-boost instead of constant high |
|
Worn battery |
Worked great for weeks, now dies quickly |
Swap in a new, fully charged cell |
Replace with LSD NiMH (AA/AAA) or LiFePO4 (if designed); avoid mystery “ultra-mAh” cells |
|
Water ingress |
Flicker, random shutoffs, cloudy lens, green/white crust on metal |
Open head and look for moisture/corrosion |
Dry, clean, reseal, add weep hole, use dielectric grease |
|
Crude driver |
Harsh bright right after dusk, steep drop-off; sudden cutout |
If you can, observe current spikes then collapse |
Choose constant-current models with low-voltage cutoff |
|
Temperature stress |
Poor winter runtime; summer fade after heat wave |
Compare performance on mild vs hot/cold days |
Store during deep freezes; prefer LiFePO4; ensure ventilation |
|
Dirty/yellowed optics |
Dim beam, tea-stained panel top |
Wipe lens/panel |
Monthly cleaning; prefer glass lenses and panels |
|
Shading |
Some units poor while others nearby are fine |
Watch shadows 2–4 pm |
Move/tilt; trim plants; remote panel on a sunny fence |

Battery chemistries at a glance
|
Chemistry |
Nominal Voltage |
Typical Cycle Life* |
Cold Behavior |
Heat Tolerance |
Notes |
|---|---|---|---|---|---|
|
NiMH (LSD) |
1.2 V per cell |
500–1,500 |
Capacity drops below 0 °C but safe; can accept mild cold charge |
Moderate |
Common AA/AAA; choose low self-discharge for longevity |
|
Li-ion (NMC/ICP) |
3.6–3.7 V |
300–800 |
Do not charge below 0 °C; big cold capacity loss |
Sensitive |
Compact/bright but needs smarter protection; can age quickly in heat |
|
LiFePO4 |
3.2 V |
1,000–3,000 |
Holds voltage better in cold; still avoid sub-zero charging |
Better than Li-ion |
Safer, longer life; increasingly used in premium garden lights |
*Cycle life depends heavily on depth of discharge, heat, and controller quality.
Make your current lights last longer (practical steps)
1) Optimize placement and cleanliness
Put the panel where it gets late-morning to afternoon sun; that’s when the battery fills. Wipe panels monthly with a damp cloth and a drop of mild soap; avoid abrasives.
See also: “Maintaining a clean module surface will increase output performance over the life of the PV system.” — Wikipedia: Photovoltaic system
2) Upgrade the battery—your biggest win
- NiMH lights: use LSD AA/AAA from reputable brands (AA 1900–2400 mAh is a sweet spot).
- LiFePO4 lights (3.2 V): match voltage and size; pick reputable cells. LiFePO4 typically outlasts cheap Li-ion by 3–5×.
- Label the install date inside the head; future you will thank you.
3) Weatherproof the weak points
Open the head on a dry day. If accessible, spray a thin conformal coating on the PCB (mask LEDs first), run a bead of silicone around cable penetrations, and grease the battery contacts. Drill a ~1 mm weep hole at the lowest point to vent condensation.
4) Tame the nightly energy load
For path marking, “medium” is usually enough. Consider motion-boost fixtures that idle dim and pop bright only when needed. Warmer LEDs (2700–3000 K) are efficient and friendlier to night pollinators.
5) Consider a remote panel
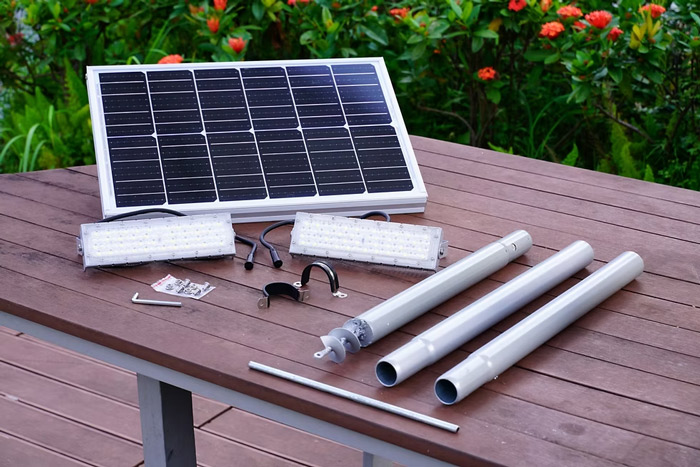
A separate 1–5 W panel mounted on a sunny fence can transform runtime, especially under trees or near eaves. Remote panels also keep the LED head cooler, lengthening component life.
6) Seasonal care
In climates with hard freezes, either run on low to avoid deep discharge or store the lights indoors mid-winter, topping up the batteries monthly.

- Real numbers: demand panel watts and battery Wh; be skeptical of vague “up to 10 hours” claims.
- Replaceable battery: standard AA/18650/14500/32650 or a labeled 3.2 V LiFePO4 pack, with chemistry clearly stated.
- Electronics that protect themselves: constant-current LED driver, low-voltage cutoff, and temperature-aware charging—especially for Li-ion.
- Weather-ready build: IP65 or better, gasketed seams, glass lens and glass-covered panel.
- Thermal honesty: products that publish operating and charging temperature ranges are usually engineered better.
- Sensible modes: motion-boost or adaptive brightness extends runtime.
- Support: a 2-year warranty and available spare parts (batteries, stakes, lenses).
Setting expectations with a little math
Suppose a light’s LED averages 0.3 W at your chosen brightness. If your panel yields ~1.0 Wh on a typical sunny day after losses, the best-case runtime is roughly 3 hours. Cloudy days, winter sun, and partial shade will cut that further. To solve for “all-night” in winter, you need at least one of the following:
- More panel: ≥2–3 W per head (or a shared remote panel feeding several heads).
- More battery: ≥5–10 Wh so one sunny day carries a couple of bad ones.
- Less load: dimmer output or motion-boost so you’re not burning watts when nobody’s around.
Most garden lights are sold with small panels and small batteries because that keeps costs down—and that’s the fundamental reason they don’t last long.
Key takeaways
- Monocrystalline has the highest area efficiency and a better temperature coefficient, so for the same footprint it usually yields the most energy.
- Amorphous (a-Si) tends to start at very low illuminance and is more tolerant of off-angle light, but its area efficiency is much lower; when size is constrained, a-Si typically loses to mono of the same size.
- Polycrystalline sits between them and is increasingly replaced by mono in small garden lights.
Practical guidance
- If the panel area is fixed (e.g., 50×50 mm), pick monocrystalline.
- If you can use a remote, larger panel, total wattage and effective sun hours matter far more than cell type; prioritize those first.
- At higher latitudes or in winter, increase tilt angle (≈ your latitude) to boost winter irradiance.
Bottom line: Do not mix different chemistries, and do not mix new/old or different capacities within the same light.
Technical reasons
- Mismatched charge profiles: NiMH (1.2 V) relies on ΔV/temperature termination, while Li-ion (3.6–3.7 V) and LiFePO4 (3.2 V) require strict CC/CV thresholds. Using the wrong charger causes over/under-charge, capacity loss, damage, or safety risk.
- Different voltage/protection limits: Swapping a light designed for single-cell NiMH with a 14500 (3.7 V Li-ion) can destroy the controller and LED.
- Unequal capacities (even same chemistry): in series/parallel packs you risk reverse charging or over-discharging a weaker cell, slashing lifespan.
Hands-on tips
- Replace with the originally specified chemistry and size (AA NiMH, 14500 Li-ion, 3.2 V LiFePO4, etc.).
- Replace as a set: across a group of lights, use the same brand/batch with closely matched capacity; for multi-cell packs, use factory-matched cells.
- In the first month after replacement, monitor runtime and enclosure temperature; stop and inspect if anything looks off.
Principles
- Within the same LED generation, higher CCT (e.g., 4000–5000 K) typically yields slightly higher lm/W than 2700–3000 K, often by 5–15%.
- High CRI (≥90) trades efficiency for color quality; vs. CRI ≈80 you may see 5–10% lower efficacy.
- Under low light and mesopic vision, the S/P ratio favors cooler whites, so cooler light can appear brighter at the same lumen level.
Choice & impact
- Maximize runtime/perceived brightness per watt: choose 4000–5000 K, CRI ≈80—it often looks brighter at the same power and can slightly extend runtime.
- Comfort & ecology first (less blue content for insects/sleep cycles): choose 2700–3000 K, CRI ≥80; accept a small efficiency hit.
Example: Two 0.3 W lights—5000 K @ 120 lm/W → 36 lm vs. 3000 K @ 100 lm/W → 30 lm. The former looks brighter or can be dimmed a bit to stretch runtime.
Material comparison
- PET laminate: good initial transmission but yellows/scratches easily; micro-cracks from thermal cycling are common; noticeable decay in 1–2 years.
- ETFE (fluoropolymer): UV-resistant, weather-tough, mildly self-cleaning with a characteristic “orange-peel” texture; maintains transmission and hydrophobicity for years—often the best value for small outdoor panels.
- Tempered low-iron glass: mechanically robust, scratch-resistant, stable transmission (~91–93%); long-term best, but heavier and costlier. Small lights may need careful edge protection.
Practical guidance
- Prefer ETFE-laminated or glass-covered heads/remote panels; avoid cheap PET where possible.
- Quick ID: ETFE feels slightly textured; PET is very smooth and scratches easily.
- Regardless of material, monthly cleaning and avoiding hard abrasion significantly slow efficiency loss.
Mechanism
- Most lights use a photoresistor or panel open-circuit voltage to detect dusk; the trigger threshold is often ~5–15 lux. Ground-level illuminance from a streetlamp can be 5–20 lux, enough to fool the controller into thinking it isn’t dark.
- Repeated half-on/half-off cycling increases switching transients and thermal stress on drivers. Meanwhile, the battery may idle and waste standby energy without getting a proper discharge cycle—making the light seem less durable.
Fixes (easiest → advanced)
- Relocate out of direct artificial light, or rotate the sensor away from the lamp.
- Add a short black light-shield tube or 3D-printed hood so the sensor sees only sky glow, not the streetlamp hotspot.
- If dusk is detected via panel voltage, ensure the panel doesn’t see the streetlamp (adjust tilt or add a narrow baffle on the lamp side).
- DIY: tweak the divider resistors to lower the dusk threshold (e.g., from ~10 lux to ~5 lux), or use a remote photocell probe mounted where it isn’t directly lit.
- When buying, pick models with adjustable sensitivity / delay (30–60 s delay reduces false triggers from car headlights or momentary glare).


