

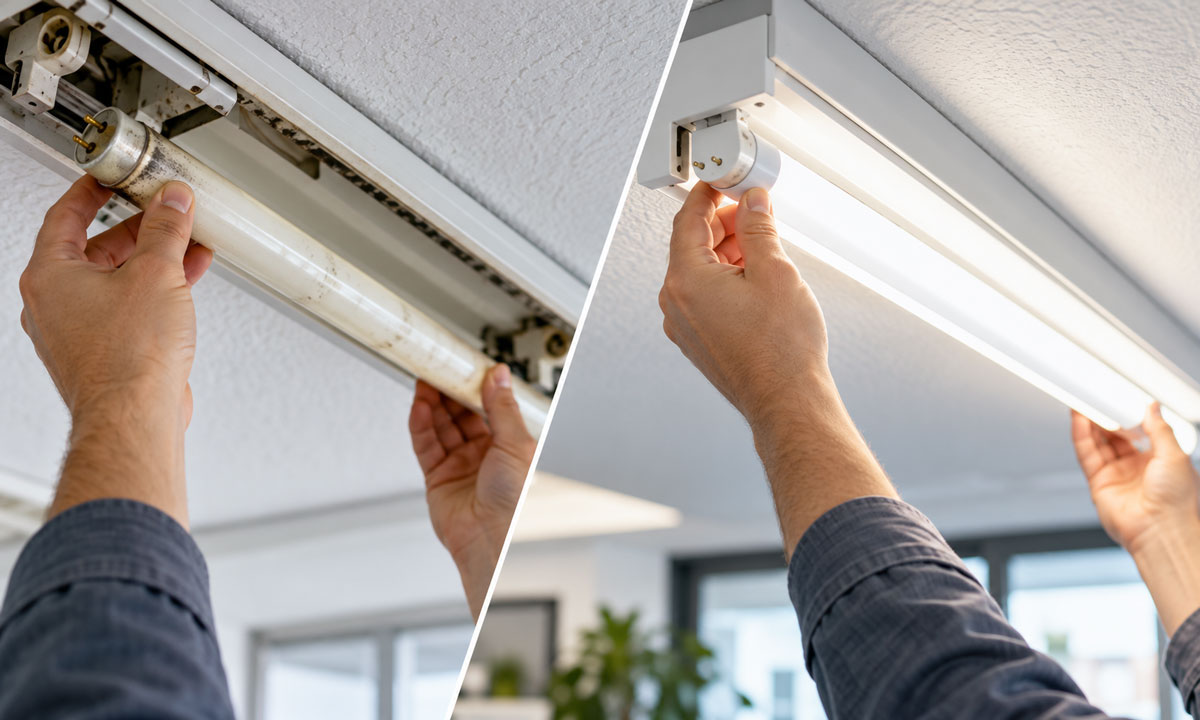
Can You Replace Fluorescent Tubes with LED Without Changing the Fixture?
Identify Your Existing Fluorescent Lighting
Compare the Main LED Replacement Options
Understand Single-Ended and Double-Ended LED Tubes
Choose the Right Brightness and Light Quality
How to Replace Fluorescent Light Bulbs with LED
How Much Energy and Money Can You Save?
Troubleshooting After an LED Conversion
Recycle the Old Fluorescent Lamps
FAQs
Replacing fluorescent light bulbs with LED can reduce electricity use, simplify maintenance, and improve the lighting in a kitchen, garage, office, or workshop. However, choosing the right replacement takes more than matching the length of the old tube.
Many fluorescent fixtures can accept LED replacement tubes, but only when the lamp, ballast, sockets, and wiring are compatible. Some replacements work with the existing ballast. Others require a professional conversion or a new fixture.
This guide focuses on linear fluorescent tubes and explains how to identify your existing setup, compare replacement options, choose suitable light output, and plan a safe installation.
Can You Replace Fluorescent Tubes with LED Without Changing the Fixture?
Often, yes. If the housing and electrical components are in suitable condition, you may be able to keep the fixture and replace its fluorescent tubes.
There are three broad approaches:
- Replace the tubes with compatible LED lamps.
- Install an LED retrofit kit inside the existing housing.
- Replace the entire fluorescent fixture with a purpose-built LED fixture.
The best choice depends on the condition of the existing equipment and the requirements of the replacement product. An inexpensive tube is not necessarily the lowest-cost solution if it leaves an unreliable ballast in service.
Identify Your Existing Fluorescent Lighting
Before ordering replacements, record the markings on the old lamp and fixture. Photograph the labels so you can compare them with product specifications.
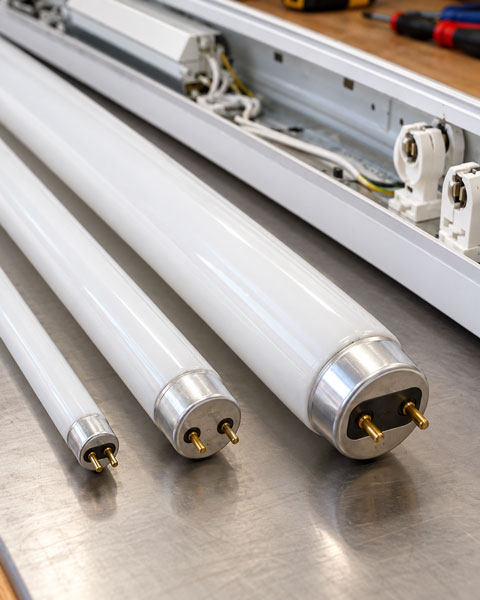
Check the Lamp Type, Length, and Base
Common straight fluorescent tubes include:
| Tube type | Nominal diameter | Common base | What to check |
|---|---|---|---|
| T5 | 5/8 inch | G5 | Exact length and whether the original is a high-output model |
| T8 | 1 inch | G13 | Ballast compatibility and replacement wiring requirements |
| T12 | 1½ inches | G13 on many standard models | Explicit approval for the existing fixture and lamp configuration |
The “T” number describes tube diameter in eighths of an inch. It does not identify the electrical requirements.
Although many T8 and T12 tubes share a G13 base, matching pins do not prove compatibility. Specialty lamps, including some high-output tubes, use different bases. Compare the full lamp code and the replacement’s dimensional drawing before buying.
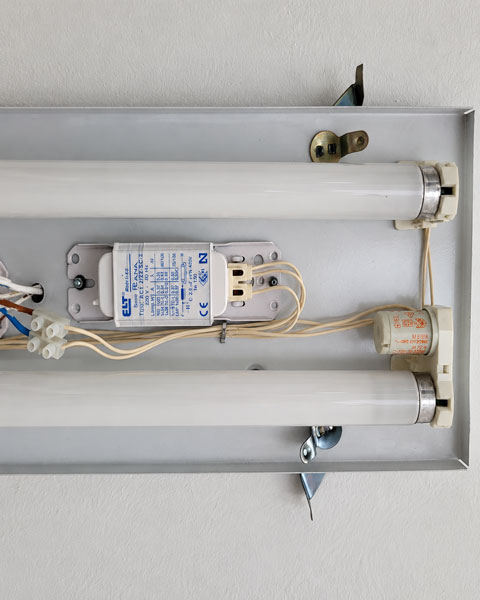
Identify the Ballast
A fluorescent ballast regulates current to the lamp. An LED replacement must either work with that ballast or use an approved arrangement that removes it from the circuit.
Check the ballast’s exact model against the LED lamp manufacturer’s compatibility list. A general description such as “electronic ballast compatible” is not enough.
Some older fixtures use a magnetic ballast and a separate starter. Certain LED tubes support those systems with a specified LED starter. Other products require a different installation method. Never assume that a starter replacement is suitable for every fixture.
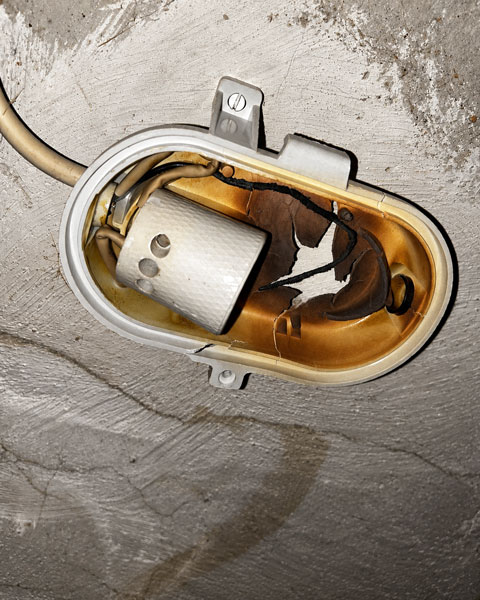
Inspect the Fixture’s Condition
Look for cracked sockets, damaged insulation, discoloration, corrosion, loose mounting hardware, and deteriorated covers.
If the fixture needs extensive repairs, compare the complete repair-and-retrofit cost with a new LED fixture. Keeping an old housing is useful only when it remains suitable for service.
Compare the Main LED Replacement Options
| Option | Power arrangement | Main advantage | Main limitation |
|---|---|---|---|
| Type A | Operates through a compatible fluorescent ballast | Minimal installation changes | Retains the ballast and its future maintenance needs |
| Type B | Operates from line voltage after an approved conversion | Eliminates the fluorescent ballast | Requires correct rewiring and socket verification |
| Type A/B | Supports specified ballast operation or bypass operation | Offers flexibility | Each operating mode has its own installation requirements |
| Type C | Uses a matched external LED driver | Replaces the old power system with matched components | Requires driver installation and rewiring |
| LED retrofit kit | Replaces specified internal components | Retains a suitable housing while updating the lighting system | Must fit the host fixture |
| New LED fixture | Replaces the complete assembly | Addresses an aging fixture as a whole | Requires fixture removal and installation |
Type A, B, and C describe the electrical arrangement of tubular LED replacements. Type A/B products support both designated operating modes; they are not universally compatible with every ballast or wiring layout.
For a sound fixture with a supported ballast, Type A may be practical. For an aging ballast, compare a Type B or Type C conversion with a retrofit kit.
If you choose an integrated LED fixture, check whether its driver or light engine is serviceable and what replacement support is available.
Understand Single-Ended and Double-Ended LED Tubes
This distinction matters when selecting ballast-bypass lamps.
Single-ended LED tubes typically receive line and neutral on separate pins at the same end. That powered end requires the socket arrangement specified by the manufacturer, commonly a non-shunted lampholder.
Double-ended LED tubes typically receive line at one end and neutral at the other. Some accept shunted or non-shunted sockets, but the installation instructions must explicitly allow the arrangement.
A shunted socket connects its two contacts internally. A non-shunted socket keeps them separate. Connecting line and neutral to a shunted socket can create a short circuit.
Do not identify socket construction by appearance alone, and do not use a generic wiring diagram in place of the instructions supplied with the lamp.
Have a qualified electrician handle ballast bypasses, socket changes, and uncertain wiring. Use a certified retrofit system suitable for the host fixture, and retain its required conversion labels and instructions.
Choose the Right Brightness and Light Quality
Compare Lumens, Not Just Watts
Watts describe electricity consumption. Lumens describe light output.
An LED tube should not be selected simply because its wattage is a particular fraction of the fluorescent lamp’s wattage. Compare the specified light output and how the replacement distributes light through the existing fixture.
For example, an LED tube may direct more light toward the work surface, while a fluorescent tube sends light in all directions. Reflectors, covers, and mounting height influence the result.
For a multi-fixture project, test one representative fixture before ordering the full quantity. Use a consistent method for measuring light intensity at desks, counters, or workbenches.

Select a Suitable Color Temperature
Color temperature changes the appearance of the light, not its lumen output.
| Color temperature | Appearance | Typical preference |
|---|---|---|
| 2700K–3000K | Warm white | Residential spaces where a softer appearance is wanted |
| 3500K–4000K | Neutral white | Kitchens, utility rooms, and many offices |
| 5000K | Cool, daylight-like white | Workshops and other spaces where users prefer a cooler appearance |
These are starting points, not mandatory room specifications. View a sample in the actual space and keep the color temperature consistent across neighboring fixtures.

Check Color Rendering
The color rendering index, or CRI, indicates how faithfully a light source renders colors compared with a reference source.
A CRI of at least 80 is a common baseline for interior lighting. Consider 90 or higher where distinguishing finishes, fabrics, food, or other colors matters. Color temperature and color rendering describe different qualities; a cooler lamp does not automatically show colors more accurately.
How to Replace Fluorescent Light Bulbs with LED
1. Confirm the Replacement Method
Before removing anything, confirm:
- The lamp’s exact size and base.
- Whether the installation uses a ballast, direct line voltage, or an external driver.
- The approved ballast model, if retained.
- Socket and supply-voltage requirements.
- The fixture types permitted by the instructions.
For a conversion, arrange the required electrical work before purchasing a large batch of lamps.
2. Isolate the Power
Switch off the relevant circuit breaker and prevent the circuit from being inadvertently energized. Verify that the fixture is de-energized with appropriate testing equipment.
A wall switch alone is not an adequate basis for working on fixture wiring. Allow the old lamps to cool, use a stable ladder, and wear eye protection.
3. Remove the Old Tubes
Remove the diffuser or cover as directed by the fixture instructions. Support each tube with both hands.
Many standard bi-pin tubes release after a quarter-turn, but other fittings use different mechanisms. Do not force the lamp or bend its pins.
Set the tubes somewhere protected from breakage while preparing them for recycling.
4. Complete the Approved Installation
For a compatible Type A replacement, retain the supported ballast and install the lamps according to their instructions.
For a Type B conversion, the electrician must remove the ballast from the electrical circuit and configure the sockets for the specific LED lamp.
For Type C, install the matched external driver and lamps. Retrofit kits and complete fixtures require their own installation procedures.
After a conversion, apply the supplied labels so future maintenance personnel can identify the correct replacement lamps. A converted fixture must not be treated as an ordinary fluorescent fixture.
5. Reassemble and Test
Secure covers and components before restoring power. Check that every lamp starts reliably and that the room has acceptable brightness and uniformity.
If the lights fail to start, repeatedly flash, or produce an unusual smell or sound, disconnect power before investigating. Do not repeatedly reset a tripping breaker.
How Much Energy and Money Can You Save?
Calculate savings using total fixture input power, including ballast or driver losses. Adding the wattages printed on the fluorescent tubes may not accurately describe the fixture’s consumption.
Use this formula:
Annual electricity savings = (old watts − new watts) ÷ 1,000 × annual operating hours × electricity price
Consider this illustrative example:
| Assumption | Value |
|---|---|
| Existing fixture input | 72 W |
| Replacement LED system input | 36 W |
| Annual operating time | 3,000 hours |
| Electricity price | $0.15 per kWh |
The annual energy reduction is:
(72 − 36) ÷ 1,000 × 3,000 = 108 kWh
Annual electricity savings are:
108 × $0.15 = $16.20 per fixture
If the installed upgrade costs $60 per fixture, the simple energy-only payback is:
$60 ÷ $16.20 ≈ 3.7 years
These are example assumptions, not a price quote or guaranteed result. Substitute your fixture specifications, electricity tariff, operating hours, and installed cost.
Include lamps, labor, socket repairs, recycling, and any future ballast replacement when comparing options. A frequently used office fixture and an occasionally used storage-room fixture can have very different payback periods.
Troubleshooting After an LED Conversion
| Symptom | Possible cause | Appropriate next step |
|---|---|---|
| No light | Unsupported ballast, incorrect lamp type, or installation error | Isolate power and verify the approved configuration |
| Only one tube works | Poor seating, a damaged socket, or an unsupported multi-lamp arrangement | Check the installation instructions and have faulty components inspected |
| Flickering or repeated restarting | Ballast incompatibility, unstable connections, or a failing component | Verify compatibility and investigate the electrical cause |
| Uneven illumination | Different lamp outputs, incorrect orientation, or unsuitable optics | Match lamp specifications and check light distribution |
| Unexpected glare | Excessive output or exposed bright LEDs | Reassess output and use an approved diffusing arrangement |
When troubleshooting flickering lights, start by checking whether the replacement matches the fixture’s electrical arrangement. A lamp that fits physically may still be unsuitable.
Recycle the Old Fluorescent Lamps
Fluorescent lamps contain mercury. Keep removed tubes intact and use a local collection service that accepts fluorescent lighting.
Check acceptance rules before traveling: a collection point that accepts compact fluorescent bulbs may not accept long tubes. Packaging requirements and disposal rules also vary by location. Recycling helps keep mercury out of the environment.
Keep the new lamp specifications and any conversion records with the building’s maintenance information. That makes the next replacement easier to identify and helps prevent an unsuitable lamp from being installed later.
FAQs
1. Can LED Replacement Tubes Work with an Existing Dimmer?
Only when the complete lamp and control system is designed for it. A dimmable LED tube may require a compatible dimming ballast, a particular external driver, or a specified control interface.
Do not assume that an existing fluorescent dimmer will operate an LED replacement correctly. Check the approved combination and dimming range before purchasing. If dimming is essential, select the lamp, driver, and controls together.
2. Can I Replace Fluorescent Tubes in an Emergency Battery-Backup Fixture?
Only with an explicitly approved emergency-lighting arrangement. Compatibility during normal operation does not establish compatibility during a power failure.
Have a qualified professional verify the LED lamps, emergency driver or inverter, and required emergency performance. A tube advertised as having a built-in battery is not automatically suitable for a building’s required emergency lighting system.
3. Are LED Tubes Suitable for an Unheated Garage or a Damp Location?
They can be, but the product ratings must match the environment. Check the lamp’s minimum operating temperature and whether both the lamp and fixture are approved for the expected moisture exposure.
An indoor LED tube does not become weatherproof simply because it replaces a fluorescent tube inside a covered area. Follow the stated restrictions for enclosed or damp-proof fixtures, including temperature limits.
4. Can a Screw-In Compact Fluorescent Bulb Be Replaced with an LED Bulb?
Usually, yes. A screw-in CFL normally contains its ballast within the bulb, so replacing it removes that ballast as well.
Choose an LED with the correct base, supply voltage, physical size, and light output. When using LED bulbs in regular fixtures, also check enclosure and control compatibility.
Pin-base CFLs are different: they commonly use a separate ballast and need a specifically compatible replacement or an approved conversion.
5. Does a 50,000-Hour LED Rating Mean the Lamp Will Last That Long?
Not necessarily. Check what the rating measures. An L70 rating describes the point at which light output is projected to fall to 70% of its initial value under specified conditions; it is not a guarantee that every lamp will remain operational until that time.
Driver failure, excessive temperature, and operating conditions can shorten service life. Compare the rated life, test conditions, warranty, and replacement support rather than relying on the hour figure alone.