

How Does a Landscape Lighting Timer Work?
Before Setting the Landscape Lighting Timer
Landscape Lighting Timer Types and Setting Methods
How to Set a Mechanical Landscape Lighting Timer
How to Set a Digital Landscape Lighting Timer
How to Set a Photocell Landscape Lighting Timer
How to Set a Smart Landscape Lighting Timer
How to Set an Astronomical Landscape Lighting Timer
What Time Should Landscape Lights Turn On?
What Time Should Landscape Lights Turn Off?
How Long Should Landscape Lighting Stay On?
How to Adjust a Landscape Lighting Timer for Different Seasons
How to Set a Landscape Lighting Timer After a Power Outage
Landscape Lighting Timer Not Working
FAQs
A landscape lighting timer controls when outdoor lights turn on and off, helping homeowners maintain consistent illumination without operating the system manually every evening. A properly programmed timer can keep pathways, gardens, architectural features, patios, and entrances illuminated during the desired hours while reducing unnecessary energy use after the property no longer needs lighting.
Setting a landscape lighting timer is usually straightforward, but the exact procedure depends on the type of timer installed. Mechanical timers use rotating dials and movable pins or tabs, digital timers rely on programmable menus, and smart timers add app-based scheduling, remote control, and automation features.
This guide explains how to set each major type of landscape lighting timer, how to choose appropriate operating hours, how to adjust seasonal schedules, and how to solve common timer problems.
How Does a Landscape Lighting Timer Work?
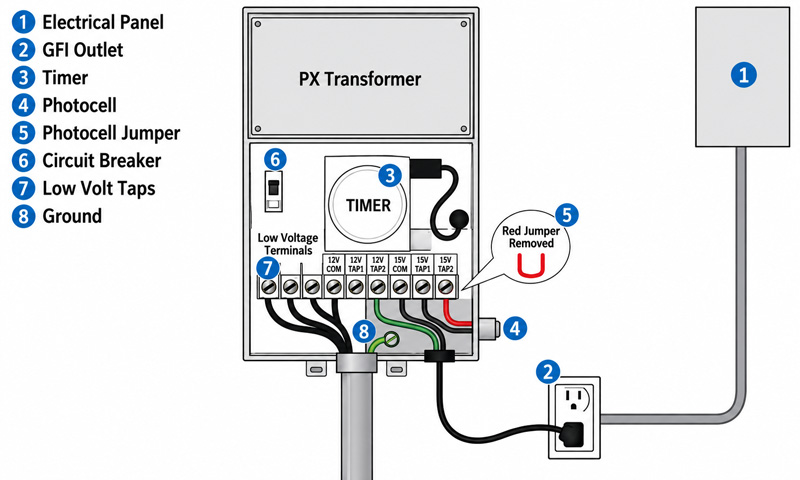
Wiring diagram of a low-voltage landscape lighting timer control system. The diagram illustrates the connections between the electrical panel, timer, photocell sensor, circuit breaker, low-voltage terminals, and transformer for automatic scheduling and dusk-to-dawn control of landscape lighting.
A landscape lighting timer acts as a control point between the electrical supply and the outdoor lighting system. At a programmed time, the timer allows power to reach the lighting transformer or lighting circuit. At the scheduled shutoff time, it interrupts that power.
Most low-voltage landscape lighting systems include a transformer that converts household voltage into the lower voltage required by outdoor fixtures. A timer may be built directly into the transformer enclosure or installed as a separate control device.
Timer designs generally fall into five categories:
The way each timer operates can vary depending on its control method, scheduling features, and connection with the lighting system. A clear understanding of how a landscape lighting timer functions helps homeowners choose the right settings and create a schedule that matches their outdoor lighting needs.
Each type performs the same basic task, but the programming method and available features differ.
Before Setting the Landscape Lighting Timer
Before changing the schedule, identify the timer type and check the current condition of the lighting system.
Start by locating the transformer or timer enclosure. Landscape lighting transformers are commonly installed on an exterior wall, inside a garage, near a utility area, or close to the landscape zone being illuminated.
Check the timer face or control panel. A mechanical timer normally has a circular clock dial. A digital timer usually has an LCD or LED display with buttons such as CLOCK, TIMER, PROGRAM, MODE, ON, and OFF. A smart timer may include Wi-Fi or Bluetooth indicators and may rely mainly on a mobile application.
Also confirm that the transformer has power and that the lighting fixtures operate normally. A timer cannot correct wiring faults, failed lamps, damaged fixtures, overloaded transformers, or tripped electrical protection devices.
See also: Fixing Landscape Lighting 2026 Guide
Landscape Lighting Timer Types and Setting Methods
The following table summarizes the most common timer configurations.
| Timer Type | Main Control Method | Typical Programming Process | Best Use |
|---|---|---|---|
| Mechanical Timer | Rotating dial with pins or tabs | Set current time, position ON/OFF tabs, place switch in timer mode | Simple daily schedules |
| Digital Timer | Buttons and electronic display | Set clock, create ON event, create OFF event, select operating days | Precise and flexible scheduling |
| Photocell Timer | Light sensor plus timer control | Select dusk activation and set duration or fixed shutoff | Automatic sunset-based operation |
| Smart Timer | Mobile app, Wi-Fi, or Bluetooth | Connect device, set location/time zone, create schedules or routines | Remote control and advanced automation |
| Astronomical Timer | Internal sunrise/sunset calculation | Set date, time, location, and desired offset | Seasonal dusk-to-dawn scheduling without a photocell |
The correct setup procedure depends primarily on which of these controls is connected to the lighting system.
How to Set a Mechanical Landscape Lighting Timer
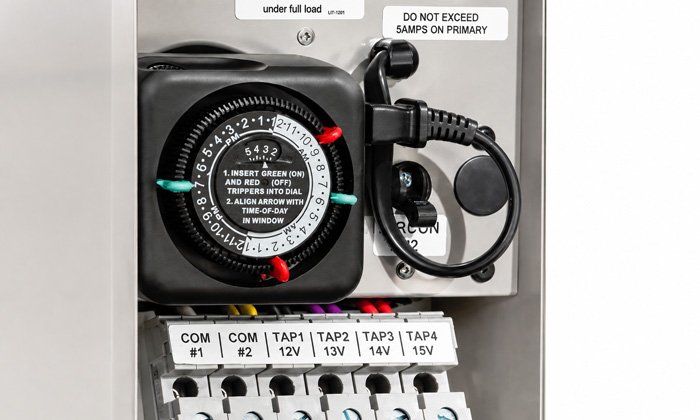
Mechanical timers remain common because they are durable, inexpensive, and easy to operate. Most use a 24-hour rotating dial that represents one complete day.
1. Locate the Current-Time Indicator
Open the timer or transformer cover and locate the arrow, triangle, or fixed marker beside the circular dial.
The numbers around the dial represent hours of the day. Some models divide the dial into AM and PM periods, while others use a 24-hour format.
2. Set the Current Time
Rotate the dial in the direction indicated by the manufacturer until the current time aligns with the fixed marker.
For example, at 4:00 PM, rotate the dial until the 4 PM marking reaches the indicator.
Avoid forcing the dial backward when the timer is designed to rotate in only one direction. Internal gears can be damaged by reverse movement on some mechanical models.
3. Set the Turn-On Time
Mechanical timers normally use removable pins, movable tabs, or push-down segments.
Position the ON pin or activation tab at the desired starting time.
For a system intended to illuminate the property from early evening onward, a starting time around sunset is common. A 7:00 PM activation during summer may become 5:00 PM or earlier during winter, depending on location.
4. Set the Turn-Off Time
Place the OFF pin or corresponding tab at the desired shutoff time.
Many residential systems remain on until 10:00 PM, midnight, or another hour based on household activity and security requirements.
5. Switch the Timer to Automatic Mode
Mechanical timers often include a manual switch with positions such as:
- ON
- OFF
- TIMER
- AUTO
Select TIMER or AUTO. Leaving the switch in permanent ON mode bypasses the programmed schedule.
6. Test the Timer
Move the dial forward carefully until it passes the programmed ON point and confirm that the landscape lights activate. Continue toward the OFF point and confirm that they shut down.
After testing, return the dial to the correct current time.
How to Set a Digital Landscape Lighting Timer
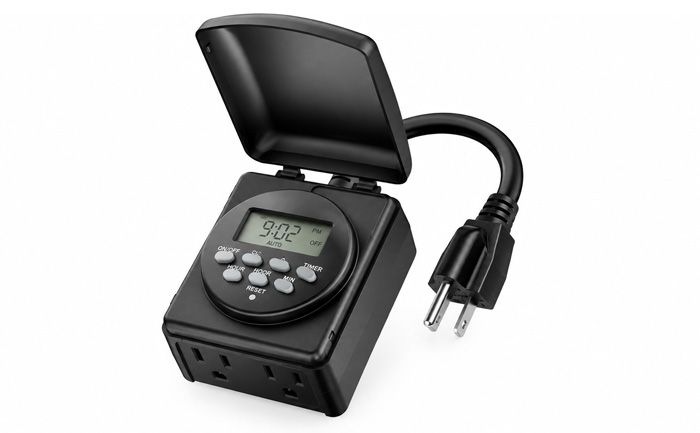
Digital timers offer more scheduling options than mechanical models. They can often support different schedules for weekdays, weekends, and individual days.
Button names vary by manufacturer, but the basic process is similar across most models.
Step 1: Set the Current Day and Time
Press the CLOCK, TIME, or SET button.
Use the HOUR and MINUTE controls to enter the current time, then select the correct day of the week.
Pay close attention to AM and PM indicators. A timer programmed for 7:00 AM instead of 7:00 PM will operate twelve hours away from the intended schedule.
Step 2: Enter Programming Mode
Press PROGRAM, TIMER, or PROG.
The display may show something similar to:
1 ON
This indicates the first programmed activation event.
Step 3: Program the ON Time
Choose the desired days of operation and enter the time when the landscape lights should turn on.
A typical schedule might be:
Daily — 6:30 PM ON
Some timers allow grouped day settings such as Monday through Friday or Saturday and Sunday.
Step 4: Program the OFF Time
Press PROGRAM again.
The display may change to:
1 OFF
Enter the desired shutoff time, such as:
Daily — 11:30 PM OFF
Many digital timers support multiple programs, allowing different lighting periods during the same day.
Step 5: Activate AUTO Mode
Exit programming and select AUTO.
The timer will follow the stored schedule while still allowing temporary manual operation on many models.
A properly programmed timer helps landscape lighting operate according to actual usage patterns, reducing unnecessary runtime while keeping outdoor spaces illuminated at the right moments. In larger installations with multiple fixtures or separate lighting areas, timer controls can also improve overall system management by creating more organized schedules and supporting better energy efficiency through automated operation. The role of timer scheduling in modern outdoor lighting systems is further reflected in the advantages of using timer controls for landscape lighting systems, where automated timing helps maintain consistent performance with less manual adjustment.
How to Set a Photocell Landscape Lighting Timer
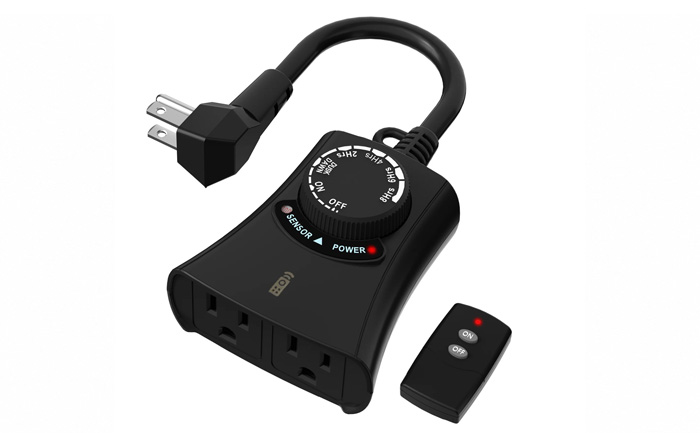
A photocell responds to surrounding light levels rather than relying entirely on a fixed clock time.
At dusk, the sensor detects lower ambient light and activates the landscape lighting system. Depending on the controller, the lights may remain on until dawn or operate for a selected number of hours.
Common settings include:
- Dusk to dawn
- Dusk + 2 hours
- Dusk + 4 hours
- Dusk + 6 hours
- Dusk + 8 hours
A dusk-plus-duration setting is often more efficient for residential properties than leaving every fixture on until sunrise.
For example, selecting Dusk + 6 Hours means the system automatically starts when outdoor light levels fall below the sensor threshold and shuts down approximately six hours later.
Keep the photocell away from direct illumination produced by the landscape fixtures themselves. Light shining onto the sensor may cause repeated switching or prevent proper activation.
The sensor should also remain unobstructed by dense vegetation, covers, accumulated dirt, or objects that create artificial darkness during daytime hours.
How to Set a Smart Landscape Lighting Timer
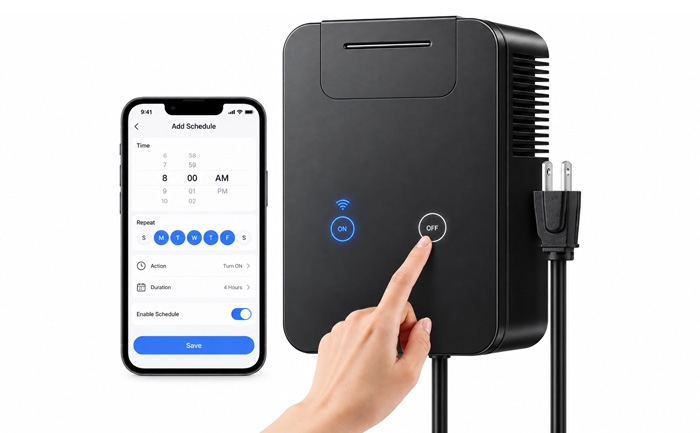
Smart timers combine traditional scheduling with app-based controls. Depending on the system, they may support remote switching, multiple lighting zones, sunrise and sunset automation, scene creation, voice control, and integration with other smart-home devices.
Connect the Timer
Power the timer and complete the wireless pairing process through the manufacturer's application.
Most Wi-Fi models require connection to a home network. Some outdoor controllers operate on Bluetooth for local control or combine Bluetooth setup with Wi-Fi operation.
Confirm the Time Zone
Smart timers usually obtain the time automatically, but the correct time zone must be selected.
A wrong time zone can shift every lighting event by several hours.
Create a Lighting Schedule
Open the schedule or automation section and select the landscape lighting device.
Set:
- Turn-on time
- Turn-off time
- Active days
- Repetition pattern
A basic residential schedule might run every day from sunset until 11:00 PM.
Use Sunset-Based Automation
Many smart timers calculate sunset from the property's location. This eliminates repeated manual adjustments as daylight hours change.
An offset can often be added, such as:
- 15 minutes before sunset
- At sunset
- 30 minutes after sunset
This is especially useful for landscapes where trees, buildings, or surrounding terrain cause the property to become dark earlier than the official sunset time.
How to Set an Astronomical Landscape Lighting Timer
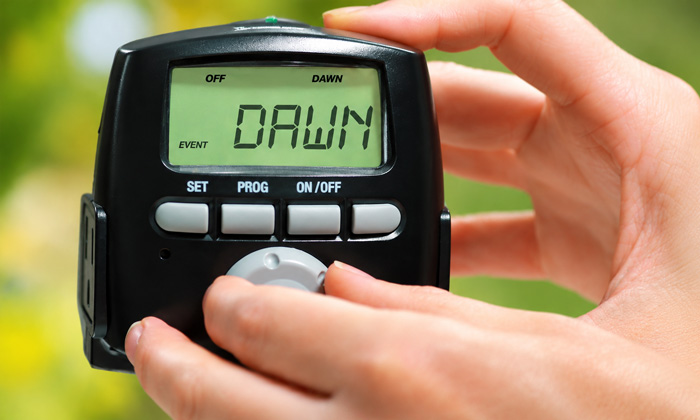
Astronomical timers calculate sunrise and sunset using the programmed date and geographic region.
Unlike a photocell, an astronomical timer does not measure actual outdoor brightness. Instead, it changes switching times automatically throughout the year.
Programming usually requires:
- Setting the current date.
- Setting the current time.
- Selecting the geographic location or region.
- Choosing sunset as the ON event.
- Choosing a fixed time or sunrise as the OFF event.
- Adding an offset when needed.
For example, the lighting system can turn on 20 minutes after sunset and turn off at 11:00 PM every night.
This arrangement combines seasonal adjustment with a consistent nightly shutoff time.
What Time Should Landscape Lights Turn On?
The most practical activation time is usually close to dusk.
Fixed schedules work well where daylight variation is limited or where homeowners adjust the timer seasonally. Sunset-based timers are more convenient where sunset changes considerably throughout the year.
Landscape lighting does not always need to activate at the exact moment of sunset. Properties surrounded by tall trees or buildings can become visually dark earlier, while open properties may retain usable natural light longer.
A slight offset from sunset can create a smoother transition between daylight and artificial illumination.
What Time Should Landscape Lights Turn Off?
The appropriate shutoff time depends on the purpose of the lighting.
Decorative garden lighting generally does not need to operate throughout the entire night. Path, entrance, and security-oriented lighting may remain active longer.
A common residential arrangement is:
Sunset to 11:00 PM or midnight
This schedule provides lighting during the hours when outdoor spaces and entrances are commonly used while avoiding unnecessary operation through the early morning.
Some properties use separate schedules for different lighting zones. Path lights may remain active longer than decorative tree uplights, while entrance fixtures may operate until dawn.
How Long Should Landscape Lighting Stay On?
Many residential landscape lighting systems operate for approximately four to seven hours per night.
The required duration depends on:
- Sunset time
- Household schedule
- Outdoor entertainment areas
- Security objectives
- Number and wattage of fixtures
- Neighborhood conditions
- Seasonal daylight patterns
Running every landscape fixture from dusk until dawn can add unnecessary operating hours, particularly when the lighting serves mainly decorative purposes.
A timer creates a predictable operating window and eliminates the need to switch the lighting system manually each night.
How to Adjust a Landscape Lighting Timer for Different Seasons
Fixed-time timers need periodic adjustments because sunset changes throughout the year.
During summer, daylight can remain available much later in the evening. During winter, darkness may arrive several hours earlier.
A simple seasonal schedule might look like this:
Summer: 8:00 PM to midnight
Spring/Fall: 6:30 PM to 11:30 PM
Winter: 5:00 PM to 11:00 PM
Exact times vary by region.
Photocell, astronomical, and smart sunset-based timers reduce the need for manual seasonal changes because their activation times automatically follow changing sunset conditions.
The shutoff time can still remain fixed. For example, a system may activate automatically at sunset throughout the year while always shutting off at 11:30 PM.
How to Set a Landscape Lighting Timer After a Power Outage
Mechanical timers often continue running only while power is available. After an outage, the dial may no longer show the correct time.
Restore the current time by rotating the dial until the actual time aligns with the timer indicator. The ON and OFF tabs normally remain in their programmed positions.
Digital timers vary. Models with backup batteries or internal memory may preserve both the clock and programmed schedule. Others retain the schedule but lose the current time.
Check:
- Current time
- Current day
- AM/PM status
- Programmed ON time
- Programmed OFF time
- AUTO mode
Smart timers connected to the internet generally resynchronize their clocks automatically once power and network connectivity return.
Landscape Lighting Timer Not Working
A timer that fails to control the lights does not always indicate a defective timer. Several simple issues can produce the same symptoms.
The Lights Stay On Continuously
Check whether the manual override switch is set to ON instead of AUTO or TIMER.
On mechanical timers, confirm that the OFF tab remains attached firmly to the dial.
The Lights Never Turn On
Confirm that the transformer has electrical power. Then verify the programmed activation time and AM/PM setting.
For photocell systems, check whether nearby artificial light is shining directly on the sensor.
The Timer Works at the Wrong Time
The clock may be set incorrectly.
Mechanical timers can lose synchronization following a power outage. Digital timers may contain an incorrect time, day, or AM/PM setting.
The Schedule Resets Repeatedly
Frequent resets on a digital timer can indicate a depleted backup battery, unstable power supply, or timer failure.
The Lights Turn On and Off Unexpectedly
Multiple stored programs can overlap on digital timers. Review every programmed ON and OFF event rather than checking only the first schedule.
Photocells may also switch unpredictably when exposed to headlights, nearby outdoor lighting, or changing shadows.
FAQs
