
Table of Contents
- Start with a dusk walk and a simple sketch
- Start with a dusk walk and a simple sketch
- Read the three specifications that change the result
- Lumens tell you how much light leaves the fixture
- Beam angle tells you how wide the light will reach
- Color temperature determines how the materials look together
- Choose between wired low-voltage and solar lighting
- Buy for rain, winter, and the way you maintain the yard
- Plan controls around your evening routine
- Build your shopping list in two passes
- FAQs
Stand at the end of your driveway after sunset. Can you see where the front walk turns? Can a guest tell whether the porch has one step or two? Now sit in your usual patio chair. If the brightest thing in view is a bare bulb across the yard, adding another light probably won’t improve the evening.
For a Beckett Ridge home, start with the route people use every night. Choose shielded fixtures that put light on the walking surface, then decide which parts of the yard are worth seeing from a window or a seat. A path light, a step light, and a garden spotlight can have the same lumen rating and produce three entirely different results. The right choice depends on where the light lands.
Start with a dusk walk and a simple sketch
Walk from the driveway to the front door carrying something you normally bring home, such as groceries. You’ll notice where you need to see the ground and where an existing porch light already does the job. Pay particular attention to the transition between two surfaces. The edge where dark asphalt meets a concrete walk can be harder to read than the middle of either surface.
On a rough sketch, mark the turns, steps, gates, seating areas, and features you enjoy looking at. Add the lights you already own. Switch them on one at a time. A garage light may reach most of the front walk while leaving the first step in shadow. That finding could narrow your shopping list from a box of path lights to one well-placed step fixture.
Check the local requirements before ordering permanent fixtures. For homes covered by the Beckett Ridge Association, its published guidance calls for advance approval of exterior improvements and a lot plat with the application. Ask how your proposed lighting should be submitted. West Chester Township also addresses shielding, light reaching neighboring lots and streets, and fixture color temperature. Save the product sheet for each model you are considering, including its dimensions, light distribution, and mounting height. Those details make it easier to ask about a specific layout.
Match the fixture to what you need to see
| Area | Fixture to consider | What to check before buying |
|---|---|---|
| Front walk or garden path | Shielded, downward-facing pathway lights | Look for the spread on the ground at the stated mounting height. A glowing cap tells you little about how much of the walk you’ll see. |
| Porch steps or a change in level | Recessed or surface-mounted step light with a shielded face | Check the beam direction and mounting depth. From the bottom step, you should see the tread edges without looking directly into the light source. |
| Planting bed or garden feature | Adjustable LED spike lights with a suitable beam angle | Check the aiming range, shield, and stake. The head should hold its position and keep the beam within the intended feature. |
| Patio or deck seating | Shielded wall light, under-cap light, or dimmable downlight | Check the view from a chair. A fixture that feels comfortable at standing height can shine directly into seated guests’ eyes. |
| Gate or side entrance | A shielded wall or post light aimed at the latch and threshold | Check whether you can see the key, latch, and ground while standing in your own shadow. |
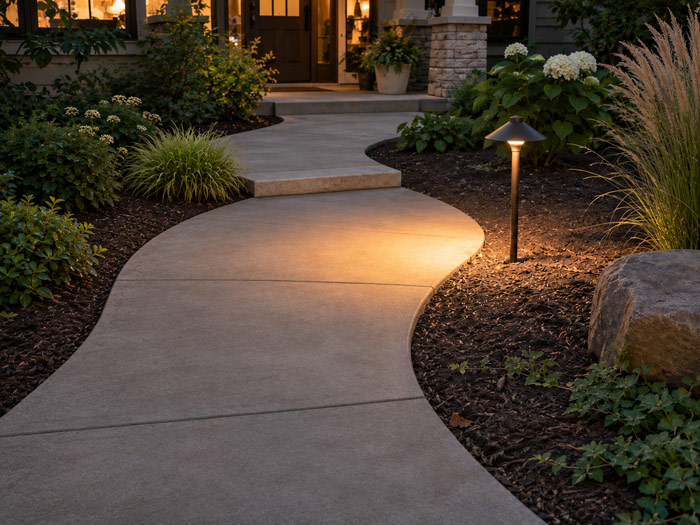
For a front walk, place your first sample near a bend or a change of level. Look at the edge of its light pool, then move the sample to see where the next fixture would need to reach. A narrow walk beside pale concrete may need a different layout from a wide path bordered by dark mulch. Buying by a fixed spacing rule can leave you with extra fixtures along the easy stretches and too little light at the turn.
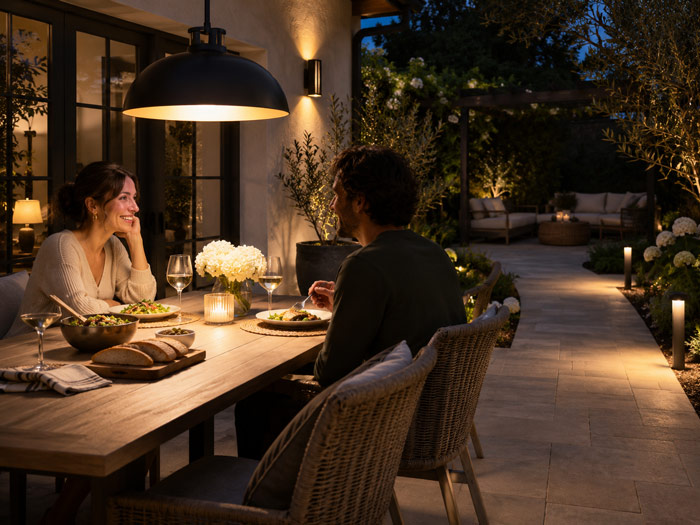
For a patio, separate dining from circulation. You might want enough light to see the food on the table while leaving the far side of the seating area quiet. Try the dining light with someone sitting opposite you. If their face is in shadow but the tabletop is glaring, change the position or distribution before choosing a higher-output model.
Read the three specifications that change the result
Lumens tell you how much light leaves the fixture
Lumens describe light output. Watts describe electrical power. When two fixtures use the same wattage, compare their delivered lumens and the way each distributes that light. A shielded path light can put more useful light on a bend than a brighter lantern that sends much of its output sideways.
For a walkway, one of the most useful details a seller can provide is a light-distribution diagram at the mounting height you intend to use. Look for the width of the illuminated area and how quickly the light falls off toward its edges. If the listing gives only a wattage and a daytime product photo, ask for a beam diagram or a nighttime example before ordering a full set.
Beam angle tells you how wide the light will reach
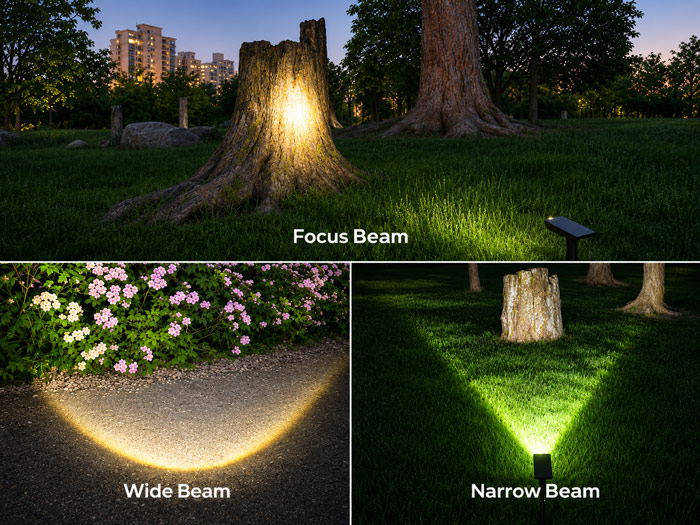
Compare focused, wide, and narrow beam landscape lighting to see how different beam angles illuminate trees, flower beds, pathways, and outdoor spaces.
Suppose you are choosing between a 25-degree and a 50-degree spotlight for a feature eight feet away. On a flat surface facing the beam squarely, the nominal beam widths are roughly 3.5 feet and 7.5 feet, respectively. Both fixtures could have the same lumen output. The narrower one concentrates it into a smaller area, while the wider one spreads it across more of the scene. The edges fade gradually, and angling the light changes the shape on the surface.
That distinction matters in a small bed. A narrow beam can pick out a piece of garden art without lighting the fence behind it. A broad beam can reveal the shape of a low planting but may carry past it. Measure the feature’s width and the available aiming distance before picking the optic. Then view the proposed position from the nearest window as well as from the yard.
Color temperature determines how the materials look together
For a residential landscape, 2700K and 3000K are useful samples to compare. A 2700K light gives a warmer appearance that often works with red brick, stained wood, and an existing warm porch lamp. A 3000K light gives a slightly crisper appearance that you may prefer on gray pavers or pale stone. Both are warm whites. The difference is often easiest to see where two beams meet on the same surface.
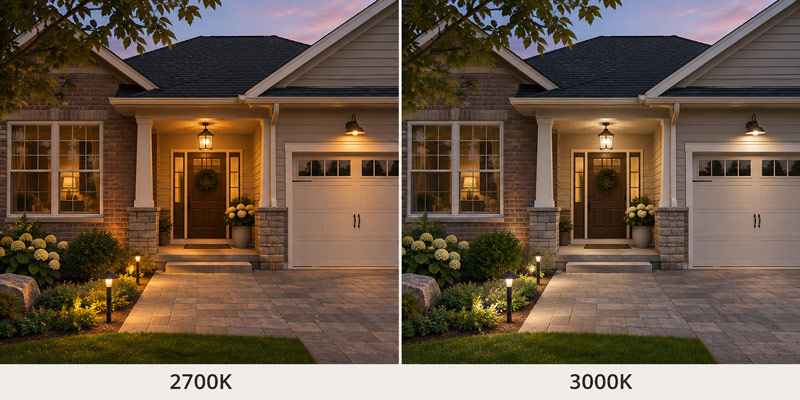
When comparing 2700K and 3000K landscape lighting, test the samples against your own brick, siding, or paving with the porch lights on. Keep output and beam angle similar so you can judge the color itself. If the path, porch, and garage are visible together, choosing a consistent warm white is a good starting point. West Chester Township’s published lighting standards set an upper limit of 4000K.
West Chester Township Board of Trustees. (2025, April 8). West Chester Township, Butler County, zoning resolution (Resolution No. 05-2025, § 8.05(C)(4), p. 90).
Choose between wired low-voltage and solar lighting
The easiest way to compare solar and low-voltage landscape lighting is to ask what happens if the light runs out early. For a decorative bed, a shorter evening display may be acceptable. For steps you use every night, predictable operating hours carry more weight.
Wired low-voltage lighting suits a frequently used route, a shaded entrance, or several fixtures you want to control together. Before buying, check the fixture’s required voltage and whether it accepts AC, DC, or both. Match those details to the power supply. Add up the fixtures’ specified loads, follow the transformer manufacturer’s sizing instructions, and account for cable length. If you expect to extend the system to a patio later, include that second phase when selecting the transformer and planning the cable route.
Solar lighting is a practical choice for an isolated flower bed or an accent you want to try before committing to a cable route. Inspect the proposed panel location during the day. A bed may look sunny at noon while a roof or tree shades the panel for most of the afternoon. Also check which brightness setting the advertised runtime applies to. Short winter days can reduce charging time, so pick wired fixtures for locations where you need dependable light late in the evening.
Buy for rain, winter, and the way you maintain the yard
A fixture in an open planting bed faces different conditions from one under a porch roof. For exposed positions, check that the manufacturer identifies the complete fixture as suitable for wet locations and for the intended mounting orientation. For a recessed model, read its drainage requirements before buying. A spot where water collects after rain deserves particular attention. A housing intended for ordinary outdoor exposure may have different limits from one designed for prolonged immersion.
Think about what happens around the fixture in February and July. A short path light next to the driveway can disappear under shoveled snow. A tall stake beside a lawn edge can catch a mower handle. Inside a planting bed, a shrub that is bare in winter may cover the beam by midsummer. Give the fixture enough clearance for the work you actually do, and choose a mounting position you can reach without stepping on plants.
Look closely at the smaller parts on the product listing. Can you order a replacement stake if one breaks? Can you adjust the head after the bed fills in? Is the lens accessible for cleaning? A model with a documented replacement part can be a better long-term purchase than a visually identical one sold only as a complete fixture.
Plan controls around your evening routine
A front entrance and a patio rarely need the same schedule. If someone arrives home late, the entry may need to stay lit after the dining area has gone dark. Look for independently controlled zones if you want that flexibility. A basic dusk sensor and timer may be sufficient for a single front walk. App control adds value when you actually want to change zones, schedules, or output from indoors.
For a patio, confirm that the fixture, driver, and control support dimming together. Ask about the minimum stable dimming level. A fixture that dims only slightly may still feel too bright over dinner. For a side gate, consider whether a motion sensor can be aimed at the approach without triggering every time someone passes on the sidewalk. Warm light, shielding, and sensible shutoff times help keep the useful light where and when you need it.
Build your shopping list in two passes
Imagine a front yard with a straight walk, one bend near the porch, two steps, and a planting bed beside the driveway. The existing porch lamp already covers the landing. For the first pass, shortlist a shielded path light for the bend and a step light whose mounting dimensions fit the available surface. Order samples or arrange a demonstration before committing to a matching set.
At dusk, judge the samples from three positions: walking toward the door, walking back toward the driveway, and standing inside looking out. A shield can hide the source beautifully in one direction and leave it exposed in the other. If the steps read clearly and the route feels continuous, you have enough information to decide whether the straight section needs another fixture. Then consider whether lighting the planting bed would add a view you actually enjoy.
For the second pass, compare the complete purchase cost. A useful shopping list includes fixture model and quantity, mounting hardware, power supply, cable and compatible connectors for a wired system, and any controller sold separately. Record the beam angle and color temperature beside each model number. Two listings with the same photograph can represent different optics, voltages, or finishes.
If you are deciding where to spend the next dollar, put it toward the darkest step, the exposed lamp you can see from your chair, or the control that lets you turn the patio off separately. Once those everyday details work, it becomes much easier to tell which decorative light is worth adding.
FAQs
1. How much electricity do LED landscape lights use per month?
Use the system’s input watts, multiply by its nightly operating hours and the number of nights, then divide by 1,000. For example, a system drawing 40 watts at the outlet for six hours a night uses 7.2 kWh in 30 days. At an illustrative electricity rate of $0.18 per kWh, that costs about $1.30 per month. Use the rate from your own bill. If you only know the combined fixture wattage, the actual draw can be slightly higher because the power supply also uses energy.
2. Can I replace halogen landscape bulbs with LEDs and keep my old fixtures?
Often, yes. First identify the existing lamp’s base, dimensions, voltage, and beam angle. Then check that the proposed LED is suitable for the housing and compatible with the transformer and any dimmer. Some older electronic transformers require a minimum load that a small set of LEDs may fall below. With an integrated LED fixture, check the model’s service instructions because it may use a dedicated module instead of a removable bulb.
3. Which outdoor lights attract fewer bugs near a patio door?
For a doorway where insects gather, consider a shielded amber light with low output. In general, outdoor lights that attract fewer insects emit less short-wavelength light. Placement also matters. A light set to one side can illuminate the threshold while moving the brightest point away from the opening. No lamp keeps every insect away, so switch it off when the doorway is no longer in use.
4. How long do LED landscape lights last, and what does the rated life mean?
Read the hour rating alongside the warranty. If a product specifies L70, that figure refers to the time at which LED output is projected to reach 70% of its initial level under defined conditions. It does not tell you when an individual fixture will stop working. The driver, seals, connections, and housing can have different service lives. When comparing two fixtures, check which components the warranty covers and whether the seller stocks them separately.
5. Why do my landscape lights flicker, and should I buy replacements?
First note whether one fixture, one group, or the entire system flickers. A single flickering lamp points toward a local issue, such as the lamp or its connection. Several fixtures flickering together suggest a shared component, such as the power supply, controller, or cable run. Also note whether it happens only when dimmed or after rain. That pattern gives a qualified technician more to work with and can spare you the cost of replacing good fixtures.
