
Table of Contents
- Step 1. Check Which Devices Your Gateway Can Control
- Step 2. Choose a Gateway Location That Reaches the Lights
- Step 3. Prepare the Ethernet or Wi-Fi Connection
- Step 4. Add the Gateway in the App and Check for Updates
- Step 5. Pair One Light and Verify That It Responds
- Step 6. Create Zones, Scenes, and Schedules
- Step 7. Test the Setup From Its Permanent Location
- Troubleshoot Common Smart Lighting Gateway Setup Problems
- FAQs
To set up a smart lighting gateway, confirm which lights it supports, connect the gateway to your home network, and add it in the setup app. Pair and test one light before adding the rest. Then organize the lights into zones, create your schedules, and test everything from its permanent location.
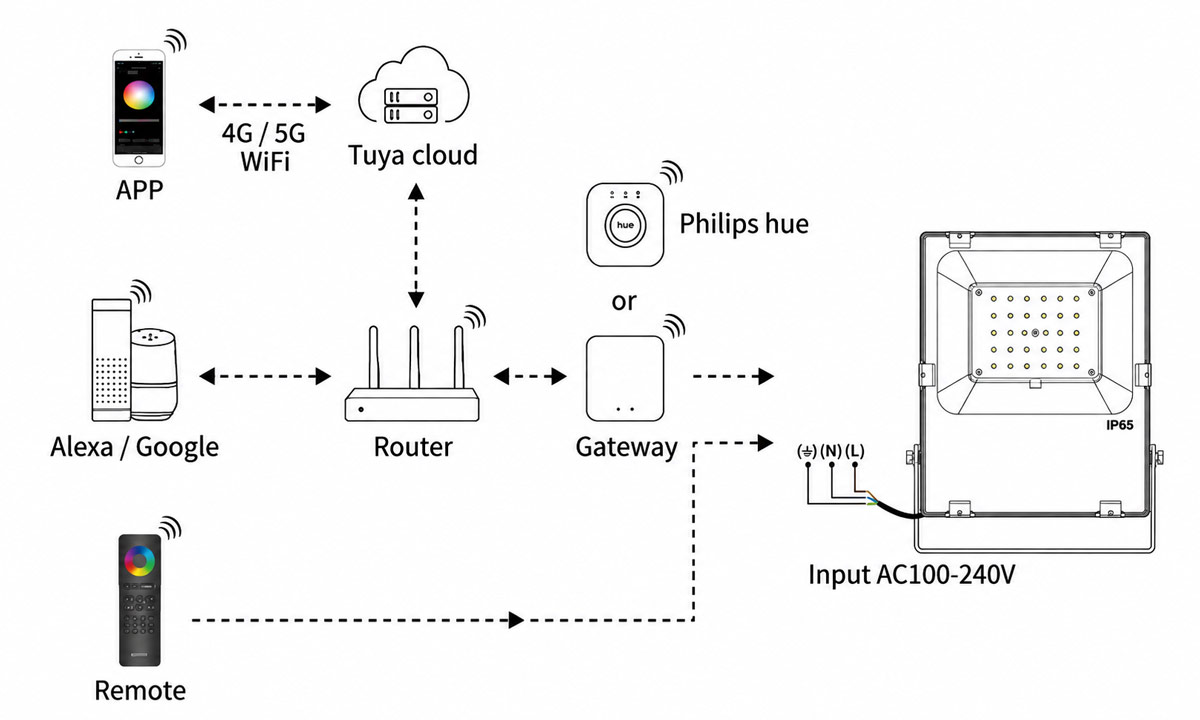
The smart lighting gateway receives app commands through the cloud service and home router, then relays them to the outdoor floodlight over a separate wireless link.
A smart lighting gateway, sometimes called a bridge or hub, connects compatible lights and accessories to the app or system that controls them. In a typical gateway-based installation, there are two connections to check. Your home network connects the app to the gateway, and the lighting network connects the gateway to the fixtures. The app can show the gateway as online while a light at the end of the driveway remains out of reach.
The setup sequence applies across all 50 states. For outdoor installations, your property’s layout, the equipment’s operating conditions, and the local time settings determine several of the choices below.
Step 1. Check Which Devices Your Gateway Can Control
Look up the exact model numbers of your gateway, lights, and any switches, remotes, or sensors you plan to add. Check the gateway’s compatibility list for those models and for the features you intend to use. A fixture may support basic on and off control while offering fewer dimming or color options through a particular integration.
| Lighting system | What to confirm before setup |
|---|---|
| Direct Wi-Fi lighting | Check whether the fixtures join your home Wi-Fi directly and whether the app or platform you want to use requires a separate controller. |
| Zigbee or a dedicated lighting network | Verify that the gateway supports the exact fixtures and accessories. Products that use the same wireless protocol can differ in supported features. |
| Matter over Wi-Fi | Confirm that your smart home platform has a compatible Matter controller and that the device supports your Wi-Fi configuration. |
| Matter over Thread | Confirm that you have a Matter controller and a Thread border router. One device can perform both roles if it supports them. |
Decide what you want to control. A smart landscape lighting controller may control a group of compatible conventional fixtures through a shared circuit. If you want to dim one path light or change the color of a single spotlight independently, choose individually addressable fixtures or separate control channels.
Have your phone, the specified gateway power supply, and the setup code or QR label ready. If the gateway uses Wi-Fi, confirm the supported band and have the network password available. If you are planning a large installation, check the gateway’s device limit and whether accessories count toward it before you pair the first zone.
Step 2. Choose a Gateway Location That Reaches the Lights
Start with an accessible outlet in an area that meets the gateway’s temperature and moisture ratings. An indoor-only gateway belongs indoors, even if every light it controls is outdoors. Check that you can still reach its buttons and read its status light after mounting it.
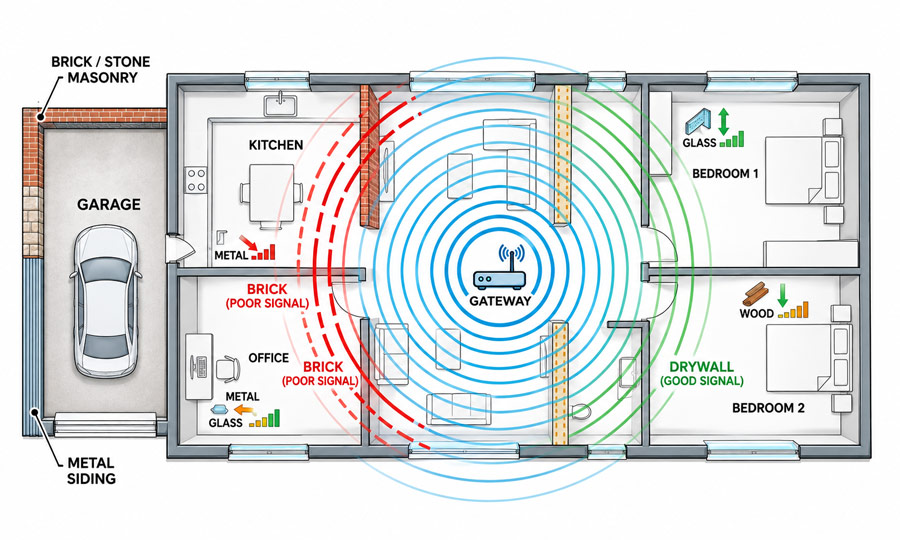
For a Wi-Fi gateway, look for a location with a reliable connection to the router and a clear path toward the lighting area. An Ethernet connection can give you more placement flexibility if you have a network jack near that area. Masonry, metal siding, and closed garage doors can weaken the signal between the gateway and outdoor lights. Test with doors and windows in their usual positions before mounting the gateway permanently.
If a distant light works during setup but drops out once it is installed, check which connection needs improvement. A Wi-Fi access point can improve a weak Wi-Fi connection to the gateway. A supported repeater or routing device on the lighting network may help when the gateway stays online and the fixtures beyond a certain point lose contact.
For U.S. outdoor projects, choose equipment rated for the exposure at the installation point. Check the minimum operating temperature for an unheated garage in Minnesota or Alaska, the upper temperature limit for a hot garage in Arizona or Nevada, and moisture and corrosion suitability near the Gulf Coast or in coastal Hawaii. For outdoor plug-in equipment, use a GFCI-protected receptacle with weather protection suitable while the cord is plugged in. Have a licensed electrician handle new receptacles, hardwired gateways, or circuit changes and verify any local permit requirements.
Step 3. Prepare the Ethernet or Wi-Fi Connection
Power the gateway with its specified adapter and let it finish starting up. Use the status indicator described in your model’s instructions to confirm that it is ready for setup. Light colors, blink patterns, and button sequences vary by model.
For an Ethernet gateway
Connect the Ethernet cable to a LAN port on your router or a network switch connected to it. Keep your phone on the Wi-Fi network that serves the same local network. Check the gateway’s network indicator if it has one. An Ethernet link confirms that the cable connection is active. The app will confirm whether the gateway has been added to your home.
For a Wi-Fi gateway
Check whether the gateway requires 2.4 GHz Wi-Fi. If it does, confirm that the band is available and follow the app’s instructions for connecting to it. Some models use Bluetooth for initial discovery, while others ask the phone to join a temporary setup network before sending the home Wi-Fi details to the gateway.
If your phone is on a guest network, local device discovery may be blocked. Use the home network configured for the gateway and allow Bluetooth or local network access on your phone if the setup app requires it.
Step 4. Add the Gateway in the App and Check for Updates
- Open the setup app listed in the gateway’s instructions. Sign in if required and select the home where the gateway will be installed.
- Choose the option to add a device and select your gateway model. Scan its setup QR code or enter the manual code if the app supports that option.
- Follow the prompts to finish connecting the gateway. For a Wi-Fi model, select the home network and enter its credentials when prompted.
- Confirm that the gateway appears online in the correct home. Give it a recognizable name such as “Main House Gateway” or “Backyard Lighting Gateway.”
- Install any firmware update the app requires. Keep the gateway powered and connected until the update finishes and the app shows it online again.
If you have more than one property in the app, confirm the selected home before adding fixtures. It is easier to correct that selection before setting up rooms, zones, and schedules.
Step 5. Pair One Light and Verify That It Responds
Start with a fixture you can easily observe. For a low-voltage garden lighting installation, confirm that the transformer’s output voltage and AC or DC type match the fixtures and that the total load is within its rated capacity. A successful wireless pairing still depends on stable power at the light.
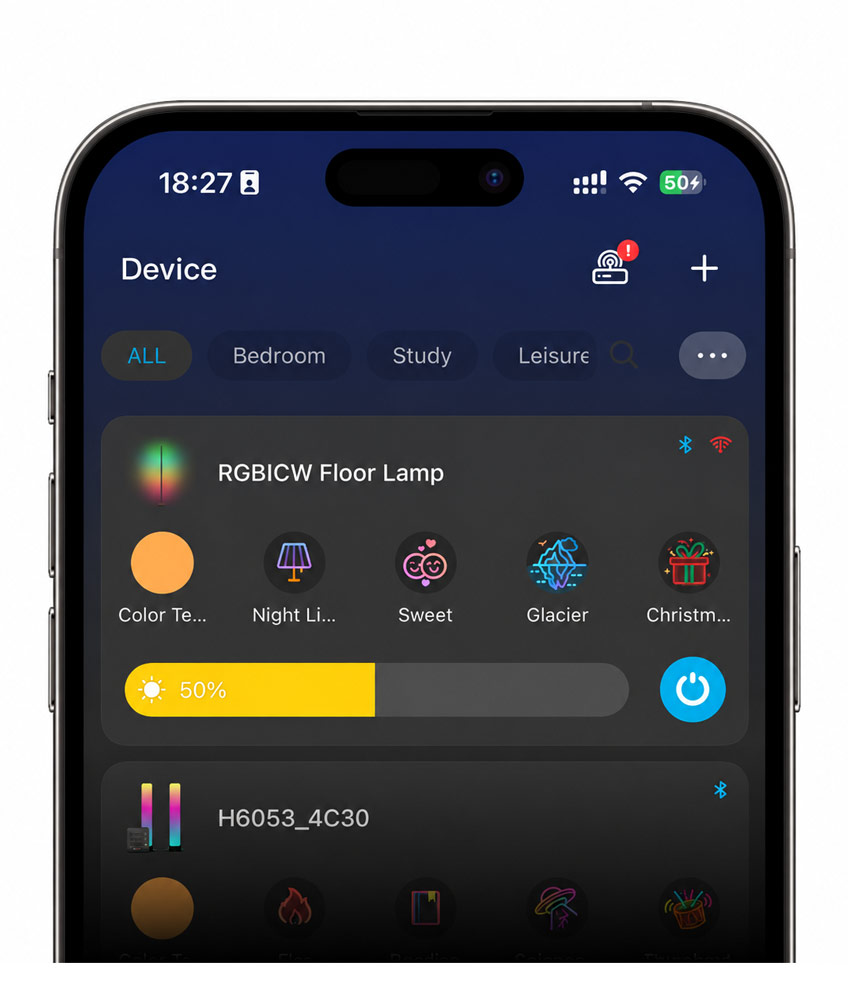
- Power the fixture and put it into pairing mode using its model-specific instructions. Some systems require you to add a remote or another control device first.
- Start device discovery in the app. Select the fixture when it appears, or follow the prompt to scan its code.
- Use the app’s identify function if available, or send an on and off command while watching the fixture. Confirm you are controlling the intended light.
- Try the controls the fixture supports, such as dimming or changing the white color temperature. Give it a location-based name such as “Front Walk 01” or “Patio Step Left.”
- Add the rest of the lights in small batches. After each batch, check the app entries against the fixtures you can see.
If you pair a portable fixture near the gateway, test it again in its intended location. If a used device is still associated with another system, follow its documented transfer or reset procedure before trying to add it.
Step 6. Create Zones, Scenes, and Schedules
A zone groups fixtures you want to operate together, such as the front walkway or backyard patio. A scene saves a combination of settings, such as dimmed patio lights with the steps at full brightness. A schedule triggers an action at a fixed time or at an event such as sunset.
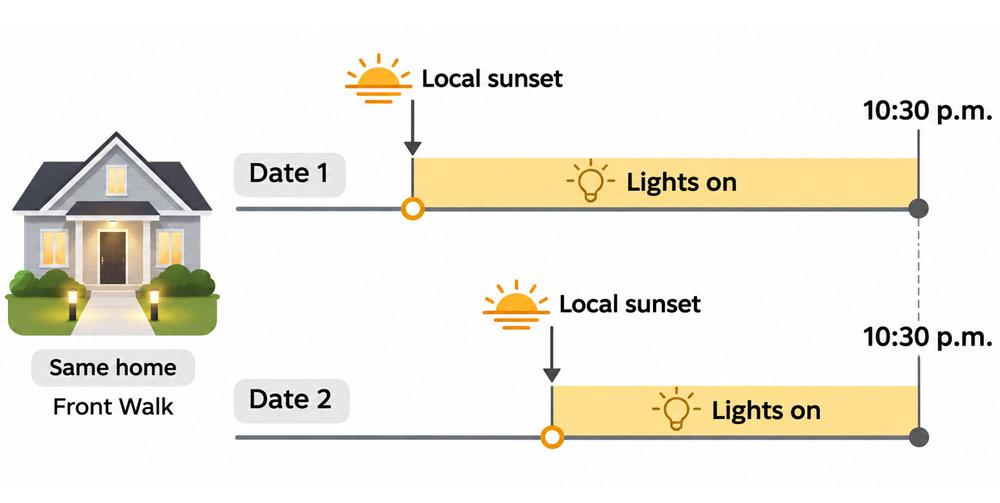
The smart lighting schedule turns the front walkway lights on at each day’s local sunset and off at a fixed time of 10:30 p.m.
Start with one schedule you can verify. For example, set the Front Walk zone to turn on at sunset and off at 10:30 p.m. Set the property’s location in the app and confirm the time zone shown for the home. Hawaii and most of Arizona use standard time year-round. In areas that observe daylight saving time, check that the schedule follows the home’s local clock. If you manage a second property, check its location and time zone separately.
For landscape lights, check which device has the final say over power. An existing landscape lighting timer or photocell can cut power to a transformer upstream of individually controlled smart fixtures. If those fixtures need continuous power, use the transformer’s supported operating mode for that configuration and let the app schedule their light output. If a smart transformer controls the whole circuit, schedule that circuit through its intended controls.
Add motion rules after the basic schedule works. Test what happens when motion triggers near the scheduled shutoff time. Depending on the system, one rule may override the other or extend the time the lights stay on.
Step 7. Test the Setup From Its Permanent Location
Walk the property with the gateway and fixtures in their final positions. Use the app to operate each zone, then test the fixture with the weakest expected connection. For an outdoor system, that may be the farthest path light, a fixture behind a wall, or a light on the opposite side of a closed garage door.
Check four things before you finish.
- Individual control. The fixture you select responds, and its name matches its physical location.
- Group control. Every fixture in a zone responds when you run a group command or apply a scene.
- Scheduled control. A temporary schedule set a few minutes ahead turns the correct zone on and off. Restore the intended schedule after the test.
- Other controls you rely on. Test any physical remote, keypad, or motion sensor you added. If you enabled remote access, switch your phone to cellular data and confirm you can still control the intended zone.
Run one check after dark. Walk the steps, path, or driveway while the programmed scene is active. This shows whether the selected brightness and the fixtures assigned to each zone work for the way you actually use the property.
Troubleshoot Common Smart Lighting Gateway Setup Problems
Start with the scope of the failure. If every fixture goes offline together, check equipment they share, such as the gateway or transformer. If one fixture fails while the others respond, start at that fixture.
| What you see | What to check first |
|---|---|
| The app cannot find the gateway. | Confirm the gateway has finished starting and is in the correct setup mode. For an Ethernet model, check whether it appears in the router’s connected-device list. |
| The gateway appears in the app but fails to join Wi-Fi. | Check the selected network name, password, supported band, and security mode against the gateway’s instructions. Try onboarding where the router signal is stronger. |
| The gateway is online, but a light never appears. | Confirm that the exact fixture model is supported, has power, and is in pairing mode. Check whether it is still registered to a previous controller. |
| Only the farthest outdoor fixtures respond intermittently. | Check whether the affected lights share a long low-voltage cable run or a weak wireless path. If they also flicker or dim unexpectedly, have the fixture supply checked under load. |
| A zone turns off at the same time every night despite a different app schedule. | Review every rule that controls the zone, including the transformer’s own schedule and any routine in another app. If there is an event log, use it to find which control sent the command. |
| Individual lights work, but a scene misses one of them. | Check the scene’s device list and whether the missing fixture supports the brightness, color, or other setting saved in that scene. |
Save a gateway factory reset for cases where the documented recovery steps call for it. A reset can remove device pairings and settings. Record your zone assignments and schedules first, or use the system’s backup feature if it offers one.
FAQs
1. Will my smart lights work if the internet goes out?
Whether smart bulbs work without an internet connection depends on where the commands and schedules run. If the router, gateway, and lights still have power, supported local controls and schedules stored on the gateway can continue to work. Remote access and automations that run in the cloud generally need internet service. Check each feature you rely on. A local wall keypad, a saved schedule, and a voice command may use different paths even when they control the same light.
2. Will I have to pair all my lights again if I replace my Wi-Fi router?
Often you can keep the existing pairings when the lights are registered to the gateway. For an Ethernet gateway, connect it to the new router and put your phone on the same local network. A Wi-Fi gateway may reconnect if the network name, password, and compatible security settings are the same. If the credentials change, look for a Change Wi-Fi or network migration option in the app. Lights that connect directly to Wi-Fi may need their network details updated individually.
3. Why do my smart lights turn on after a power outage?
Many smart fixtures have a default setting that determines what they do when power returns. Look for Power-On Behavior or Power-Loss Recovery in the fixture’s settings. Depending on the model, it may restore the previous state, stay off, or turn on at a preset brightness. Check the setting on each affected fixture because lights in the same group can have different recovery behavior.
4. Can I use smart bulbs with an existing wall dimmer?
Use the combination only if the bulb manufacturer explicitly supports it. Many smart bulbs need steady, undimmed power because their own electronics regulate brightness. An incompatible wall dimmer can cause flickering, buzzing, or intermittent disconnections, even at its highest setting. If you want dimming at the wall, check for a compatible wireless keypad or wall control designed for your lighting system.
5. Do smart lights use electricity when they’re turned off in the app?
Yes. A powered smart bulb typically draws some standby electricity to listen for commands, and a gateway draws power while operating. A gateway averaging 3 watts around the clock uses about 26.3 kWh per year, or about $4.20 per year at an illustrative rate of $0.16 per kWh. To estimate your own cost, use your utility rate and the equipment’s published or measured power draw. Count bulb standby consumption during the hours the lights are off and operating consumption during the hours they are on.
IEA 4E Solid State Lighting Annex. (2022, November 17). Standby of smart lamps – Second report. 4E Energy Efficient End-use Equipment.
