

Table of Contents
- Start by Identifying Which Component You Need
- What End Cap Shape Can Tell You
- Read the Diffuser Profile at Its Retaining Edges
- Measure the Housing and the Existing Diffuser Together
- Give a Small Interface Mismatch More Weight Than Several Visual Matches
- Confirm Mechanical, Optical, and Environmental Compatibility
- Build an Identification Record That a Supplier Can Use
- FAQs
Identifying a light fitting without a readable model number starts with its construction. The end cap reveals how the housing closes, while the diffuser profile shows how the light cover attaches. Comparing these features with accurate measurements can narrow the search for a replacement fitting, end cap, or diffuser.
The important distinction is between recognising a fitting family and confirming that a replacement will work. Several fittings can share the same rounded end cap or milky cover while using different retaining grooves, screw positions, or seals.
For linear LED fittings, the most useful identifying details are often the small features hidden behind the visible surface.
Start by Identifying Which Component You Need
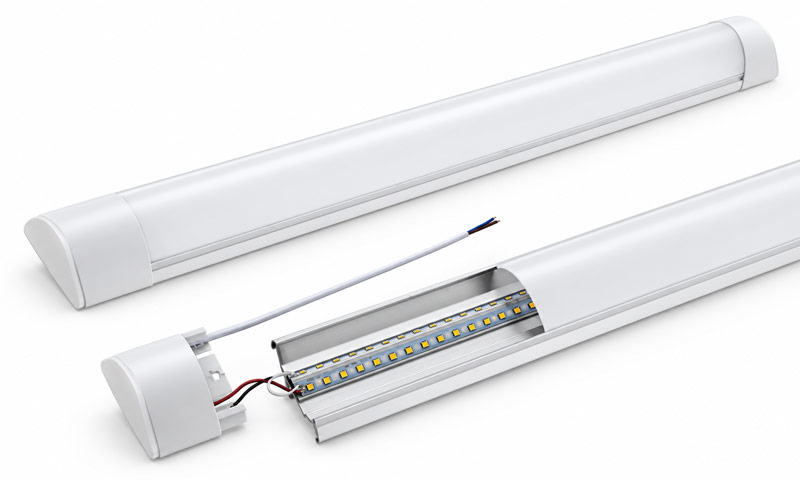
Before comparing shapes, establish whether you need a replacement diffuser, a structural end cap, or the complete fitting. Each requires different evidence.
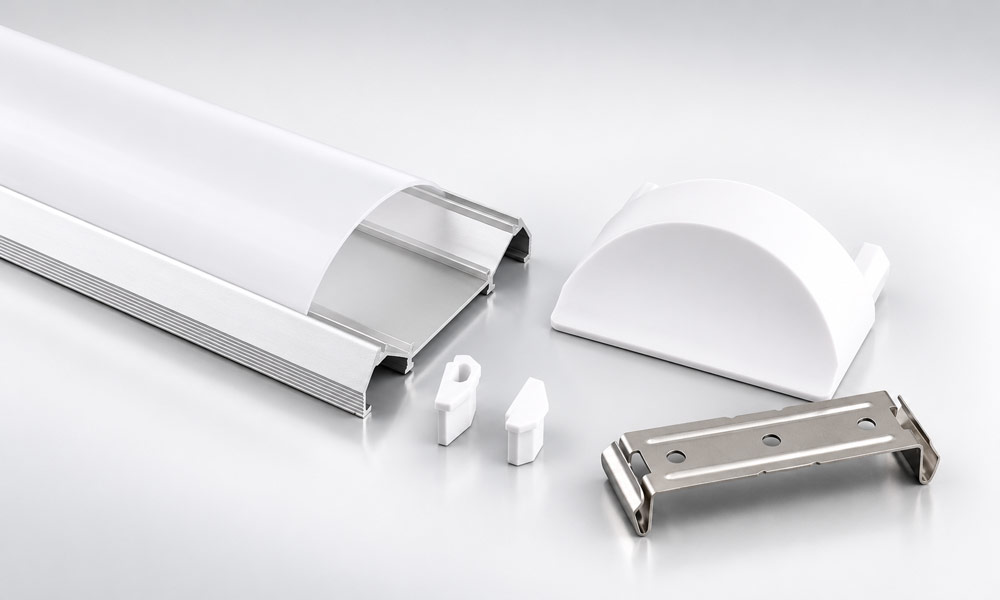
A diffuser replacement depends on its cross-section, retaining edges, finished length, and optical properties. An end cap must match the housing interface, fixing method, and any sealing features. Replacing the complete fitting also requires checking its mounting arrangement and electrical specifications.
In this guide, “end cap” means the piece closing the end of the fitting’s housing. A lamp base with electrical contacts is a separate component.
Read any surviving label before removing parts. A model number, manufacturing code, or installation drawing can resolve details that photographs cannot. Switch off and isolate the supply before inspection, allow the fitting to cool, and follow its service instructions. Factory-sealed fittings should not be opened simply to obtain a profile photograph.
What End Cap Shape Can Tell You
The end cap provides a useful first filter because it often follows the outline of the housing and diffuser.
However, these shapes are descriptive categories. They are not universal compatibility standards.
| End cap appearance | What it may suggest | Detail that needs confirmation |
|---|---|---|
| Narrow rectangular cap with a flat light face | A compact linear housing or LED channel | Internal locating features, screw positions, and diffuser slot |
| Rounded or D-shaped cap | A curved diffuser over a flatter backing | Curve depth, shoulder position, and retaining edges |
| Broad cap around a deep wraparound cover | A fitting with a diffuser covering its underside and sides | Side returns, flange geometry, and cover support |
| Angular or triangular cap | A corner-mounted housing or directional profile | Mounting angle and orientation of the light face |
| Cap with a gasket, screws, or compression features | A housing incorporating a sealed closure | Gasket seat, engagement depth, fixing arrangement, and documented protection rating |
Inspect the Inner Face of the Cap
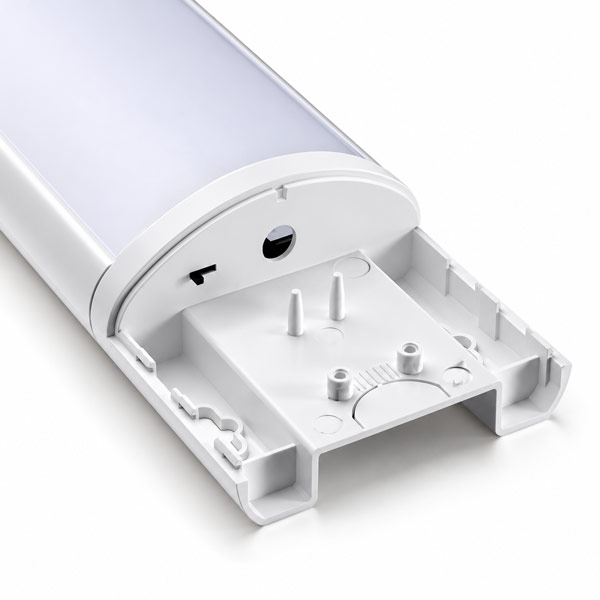
The outer face is useful for recognition. The inner face often provides stronger evidence of compatibility.
Look for locating tongues, ribs, screw bosses, stepped shoulders, and the recess receiving the diffuser. These features determine where the cap sits and how the assembly closes.
Photograph both ends of the fitting. One cap may have a cable entry while the opposite cap is closed. Other designs use different locating details at each end.
A replacement can resemble the original from the front yet stop short because an internal rib meets the wrong part of the housing. That hidden interference matters more than a matching colour or corner radius.
Read the Diffuser Profile at Its Retaining Edges
The diffuser profile is its shape when viewed directly from the end. It includes the visible light-emitting surface and the edges that engage with the fitting.
Those edges deserve close attention.
A cover that appears flat from below may have a hook along each side. A curved diffuser may attach through small beads, folded returns, or stepped lips that are almost invisible in an installed photograph.
Some diffuser covers are explicitly designed to snap into a dedicated profile, which illustrates why matching the visible face alone is insufficient.
Separate the Visible Shape From the Attachment Shape
Record these two aspects independently:
- Visible shape: flat, shallow curved, domed, wraparound, or asymmetric.
- Attachment shape: straight edge, inward hook, outward lip, bead, flange, or stepped return.
This produces a more useful description than “a curved white diffuser.”
For example, “shallow curved cover with inward-facing retaining hooks” immediately distinguishes it from a similar cover whose lips turn outward.
Check How the Cover Enters the Housing
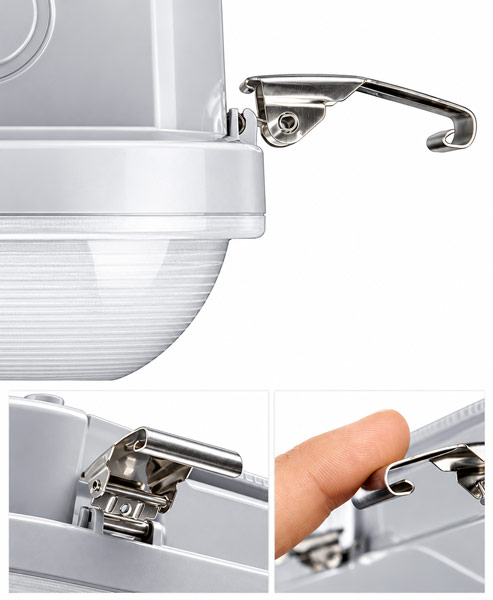
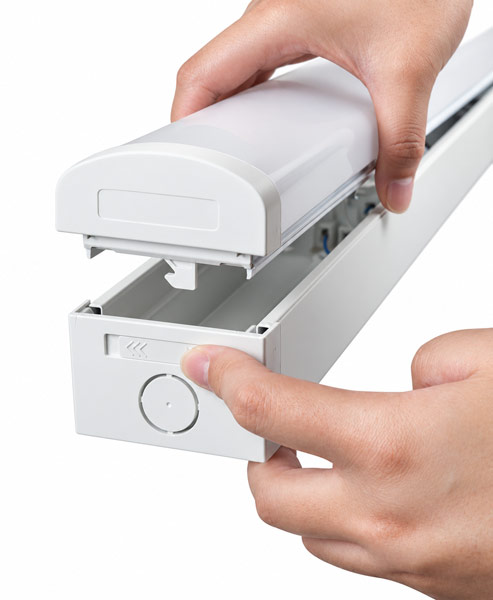
Determine whether the diffuser slides in from the end, snaps into longitudinal grooves, rests on supporting ledges, or is held by separate clips.
Follow the original removal instructions. Forcing a slide-in cover downward can damage its edges, while a rigid cover may not tolerate the bending that another design requires.
Also record the orientation of any textured surface. A prismatic or directional lens may need to face a particular way to reproduce its intended light distribution.
Measure the Housing and the Existing Diffuser Together
A surviving diffuser preserves valuable information about its original profile. The housing provides a second reference when the old plastic has bowed, cracked, or distorted.
Use both whenever possible. Replacement-cover guidance consistently emphasises finished dimensions, end profiles, retaining features, and photographs of the attachment method.
| Measurement | What to record | Why it matters |
|---|---|---|
| Diffuser length | Actual end-to-end length | The cover may fit inside end caps rather than match the housing length |
| Maximum outside width | Widest point of the cross-section | Describes the overall envelope |
| Width at the retaining edges | Distance between clearly identified matching points | Helps establish whether the edges can engage |
| Profile height | Height from the seating reference to the outermost surface | Determines clearance beneath the cap and within the housing |
| Edge or wall thickness | Thickness at an intact, representative section | Affects seating and engagement |
| Lip or hook geometry | Direction, depth, and position of returns | Distinguishes visually similar profiles |
| End cap interface | Screw centres, insertion depth, and locating features | Establishes whether the cap can seat correctly |
State exactly where each measurement was taken. “Width: 25 mm” is ambiguous if one person measures across the dome and another measures between the retaining hooks.
Use a ruler or tape for overall length and callipers for small interface dimensions where accessible. Measure intact sections without squeezing the plastic into a different shape.
Do not apply a universal clearance allowance. A suitable gap depends on the specific retaining system, material, and installation instructions.
Keep Three Different Lengths Separate
The advertised fitting length, housing length, and diffuser length may differ.
An end cap may overlap the diffuser or contain a pocket receiving its end. Consequently, a fitting sold under a nominal length does not automatically require a diffuser of that exact length.
Record the physical dimensions of each component separately, then compare them with the replacement drawing.
Give a Small Interface Mismatch More Weight Than Several Visual Matches
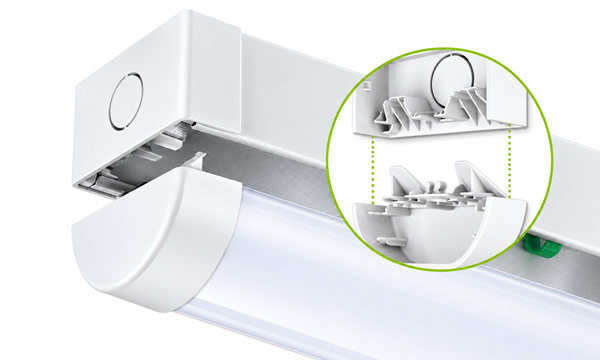
A useful identification rule is to eliminate candidates through incompatible features before comparing cosmetic similarities.
Consider an illustrative example: two diffusers have the same length, outside width, shallow dome, and white appearance. One has inward-facing hooks. The other has outward-facing lips.
The matching dimensions do not overcome the different attachment geometry.
A similar problem occurs with end caps. Two caps may have matching outer dimensions, but a different screw position or internal shoulder can prevent one from seating.
A confirmed mismatch at a required interface is enough to reject a candidate.
This approach also helps when a product has changed during production. A familiar outer shell does not establish that every internal detail remained the same. Compare the actual replacement drawing, part revision, or sample with the installed fitting.
Treat an unknown dimension as unresolved. It should not become an assumed match simply because the other features look convincing.
Confirm Mechanical, Optical, and Environmental Compatibility
A replacement should do more than attach successfully. It needs to perform the functions assigned to the original component.
Mechanical Compatibility
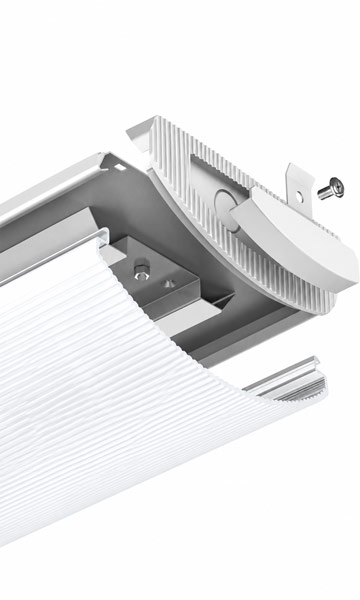
The diffuser should seat through its intended attachment method. End caps should close fully, fasteners should align, and retaining features should engage without improvised bending, packing, or excessive force.
Check the assembled ends as well as the middle of the cover. A diffuser can appear secure along its length while interfering with an end cap.
If a candidate requires filing away a retaining hook or forcing a rigid cover into a different curve, its compatibility has not been established.
Optical Compatibility
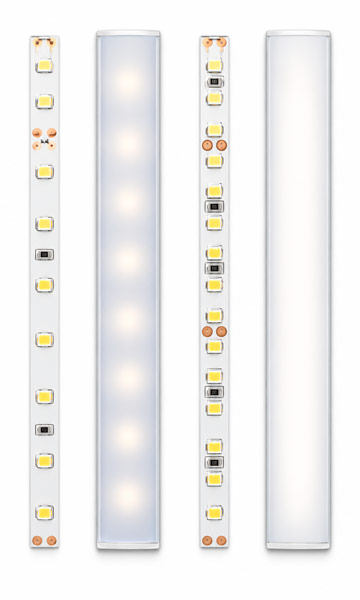
Two covers can look equally white when switched off yet behave differently when illuminated.
Light transmission, scattering, thickness, surface texture, and the distance between the LEDs and the diffuser all influence the result. Research into diffuser materials demonstrates that similar unlit appearances can conceal substantial differences in how effectively they hide individual LED points.
For an optical replacement, compare:
- Visibility of individual LED points.
- Uniformity across the illuminated surface.
- Brightness from normal viewing positions.
- Distribution of light onto the intended surface.
- Appearance alongside neighbouring fittings.
A more uniform-looking cover does not automatically establish lower glare. Visual comfort also depends on the light source’s luminance distribution and the conditions in which it is viewed.
When comparing light output in lumens, use data for the relevant assembled configuration. The diffuser’s appearance alone cannot establish the fitting’s delivered output.
Environmental Compatibility
For outdoor or damp-location fittings, the cover and end cap may form part of the enclosure’s protective boundary.
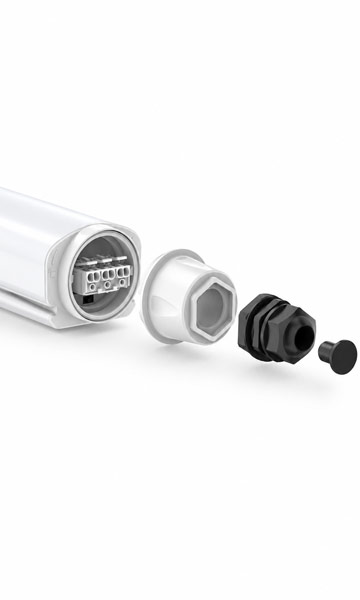
Check the gasket seating surface, cap engagement, cable-entry arrangement, and specified assembly method. A cap that closes without reproducing the original sealing interface may leave an ingress path.
IP codes classify protection provided by enclosures. A replacement component’s similar appearance does not establish the protection of the completed assembly.
Understanding the difference between IP44 and IP65 helps define the environmental requirement. Retaining that protection after replacement requires the correct parts and assembly instructions.
If the complete fitting is being replaced, separately verify its supply requirements and mounting specifications. These cannot be determined from its end cap shape.
Build an Identification Record That a Supplier Can Use
A useful identification request shows how the parts interact.
Prepare the following:
- A complete fitting photograph showing its mounting arrangement and overall proportions.
- Straight-on photographs of both ends, including any cable entry.
- An end-profile photograph of the diffuser, with a scale beside it in the same plane.
- Close-up photographs of retaining grooves, clips, and accessible cap interfaces.
- A dimensioned sketch and a photograph of every surviving label or part marking.
Keep the camera square to the profile. An angled photograph can make a flat surface appear curved or obscure a small retaining lip. A traced profile can supplement the photographs when a formed cover is difficult to describe.
Ask the supplier to identify which drawing or part reference confirms the match. A response based only on a general product photograph leaves the critical interfaces unresolved.
For properties with repeated fittings, retain the confirmed part number, installation location, profile photographs, and replacement date. Inspect representative units before placing a bulk order, particularly where previous repairs may have introduced different versions.
FAQs
1. Can I Cut a Replacement Light Diffuser to Length?
Some diffuser products are supplied for cutting to a specified length, but this must be confirmed for the particular cover. Finished parts may include end features or sealing details that cutting would remove.
Specify the required finished length and ask whether supplier cutting is available. Follow the product’s processing instructions so the retaining edges and final seating remain intact.
2. Can I Use a 3D-Printed Replacement End Cap?
A printed cap can help check geometry during development, but installation requires suitable material and finished-part performance. Heat exposure, electrical insulation, fastening loads, and weather exposure may all matter.
Research has found that injection-moulded material ratings cannot automatically be transferred to parts made from the same material through 3D printing. A matching shape therefore needs further evaluation before service use.
3. Why Does My LED Fitting Flicker After the Diffuser Is Replaced?
A passive diffuser does not regulate the LED supply. If flickering starts after replacement, possible causes include a disturbed connection, trapped wiring, an existing driver problem, or overheating associated with an unsuitable component.
Isolate the supply and have the assembly checked where necessary. For outdoor installations, troubleshooting flickering lights should also consider moisture and connections elsewhere in the lighting circuit.
4. Can an LED Tube Replace a Fluorescent Tube if the Pins Match?
Matching pins establish only part of the physical fit. LED tubes may operate through an existing compatible ballast, require a separate driver, or need a specified conversion of the fitting.
Check the replacement lamp’s instructions and compatibility information. A tube requiring altered wiring must be installed through the appropriate conversion procedure by a suitably qualified person.
5. How Can I Tell Whether a Diffuser Is Acrylic or Polycarbonate?
Look for a material marking: PMMA commonly identifies acrylic, while PC identifies polycarbonate. Confirm the material and grade through the part specification or supplier.
Colour, clarity, and flexibility alone do not reliably establish the exact material. Diffuser formulations and thicknesses vary, so visual identification should not determine a replacement’s temperature, impact, or outdoor suitability.
