
Three Professional DIY Builds for Solar Garden Lights
1. Solar jar lanterns (warm, decorative, low risk)
2. Low-voltage path lights from copper pipe (durable, modern, scalable)
3. Recycled can uplights for plant accents (focused, dramatic, budget-friendly)
Execution guide (bullet-point section)
Planning (do this first)
Tools and materials (common list)
Weatherproofing rules that prevent 90% of failures
Build steps: solar jar lanterns (quick checklist)
Build steps: 12V copper path lights (clean, scalable)
Placement and aiming (what pros do)
Maintenance schedule (simple but effective)
Common mistakes and how to avoid them
FAQs
A well-designed set of garden lights does more than help you see the path at night—it shapes mood, improves safety, highlights landscaping, and extends the time you actually enjoy your outdoor space. The good news is that “DIY garden lights” doesn’t have to mean messy wiring or unreliable fixtures. With a clear plan, a few proven construction methods, and the right materials for outdoor conditions, you can build lighting that looks professional and lasts through rain, heat, and seasons.
Before building anything, decide what your lighting is meant to accomplish. Most gardens benefit from a layered approach: low path lighting for safe walking, accent lighting to highlight plants or architectural features, and ambient lighting that makes seating areas feel inviting. Once you know the purpose, choose a power approach: solar, low-voltage (typically 12V), or battery/USB. Solar is easiest and safest (no wiring), but performance depends heavily on sun exposure and panel quality. Low-voltage is the most reliable and scalable for bigger yards, while battery or USB-powered solutions fit small patios and temporary setups.
A professional-looking DIY result starts with weatherproofing. Outdoor fixtures live a hard life—UV exposure, condensation, watering systems, and temperature changes are constant. Whatever you build must keep water out of electronics, prevent corrosion, and remain stable in soil or gravel. That means using outdoor-rated parts when possible, sealing openings correctly, and selecting materials that won’t degrade (or at least degrade gracefully). It also means thinking about maintenance: can you replace the battery, LED module, or solar cell without destroying the fixture?
One of the simplest ways to create attractive garden lights is to repurpose common containers—glass jars, metal cans, ceramic planters—into a protective “shell” for a light source. For solar lights, you can buy inexpensive solar garden stakes and reuse the solar “top” (panel + LED module) inside your own housing. This is a classic upgrade path: cheap solar internals often look bland in their original plastic stake, but placed into a frosted jar or a properly finished metal lantern, they look custom and upscale. If you choose low-voltage LED modules, you can build sturdier fixtures with more consistent brightness and runtime, but you’ll need a transformer and outdoor-rated cable routing.
Safety matters. If you use low-voltage systems, keep the transformer plugged into a GFCI-protected outdoor outlet, route cables away from high-traffic areas, and avoid burying non-rated wire. If you use any mains-voltage components (120/230V), do not DIY splices outdoors unless you are qualified and permitted by your local electrical code—mains electricity and moisture are a dangerous combination. The most “pro” DIY approach for most homeowners is solar or 12V low-voltage kits designed for outdoor landscape lighting.
Below are several proven DIY builds—some paragraph-style “how to” explanations, and then a structured checklist section so you can execute cleanly like a project.
Three Professional DIY Builds for Solar Garden Lights
Benefits of DIY Builds
DIY solar lighting projects offer a host of benefits for anyone looking to enhance their outdoor space. One of the biggest advantages is the ability to customize your setup—whether you want wall mounted lights to brighten up a patio, string lights to add a soft glow to your garden, or spotlights to highlight your favorite plants. With so many solar lights available, you can tailor the design and placement to perfectly suit your yard, creating the exact ambience you want for relaxing evenings or lively gatherings.
Another key benefit is cost savings. Solar lights harness energy from the sun, so you can illuminate your garden or pathways without increasing your electricity bill. Once installed, these lights require little maintenance, thanks to their weather resistant construction and durable solar panels. Even on cloudy days, modern solar lights are designed to store enough energy to provide reliable brightness from dusk until dawn, ensuring your outdoor space remains inviting and functional.
DIY builds also give you the flexibility to address specific functional purposes, such as lighting up a pathway for safety or adding decorative touches to fences and patios. Because you’re in control, you can position each light to maximize coverage and effect, all while enjoying the satisfaction of a project completed with your own hands. With minimal maintenance and no need for professional installation, DIY solar lighting is a practical, stylish, and rewarding way to brighten your yard or garden—delivering both immediate and long-term benefits for your home and lifestyle.
1) Solar jar lanterns (warm, decorative, low risk)
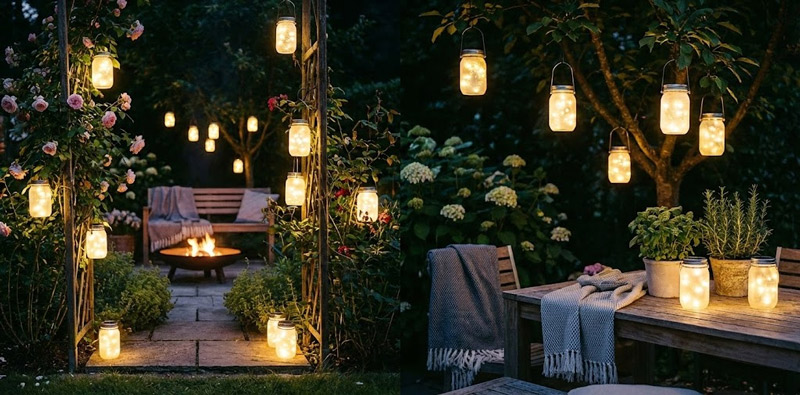
Solar jar lanterns are ideal for borders, patios, and hanging from shepherd’s hooks. Start with thick glass jars (mason jars work, but any jar with a stable base is fine). Choose either: (a) a solar “lid” insert designed to fit standard jars, or (b) a cheap solar stake light that you can harvest for the solar top. The goal is to mount the solar panel so it gets direct daylight and to position the LED so it shines into the jar. When hanging the jars, make sure to hang them at a height and location where the solar panel receives six to eight hours of direct sunlight for optimal charging and performance.
For a premium look, add diffusion. Clear glass can create harsh points of light; frosted glass spreads the glow. You can buy frosted jars, use a light coat of glass frosting spray, or apply translucent vellum inside the jar. If you want a brighter, softer effect, line the inside with a thin layer of white translucent plastic (like a cut strip from a milk jug—cleaned thoroughly) or use outdoor-rated parchment-style lantern paper.
The main technical challenge is moisture management. Jars trap condensation. Drill (or create) a tiny vent hole near the top side of the jar (not the lid) and place a small silica gel pack inside, away from direct contact with the LED. Seal the lid area with a gasket or a thin bead of clear outdoor silicone, but don’t fully hermetically seal everything—temperature changes can pull moisture in. A controlled vent plus limited sealing typically works better than “gluing it shut.”
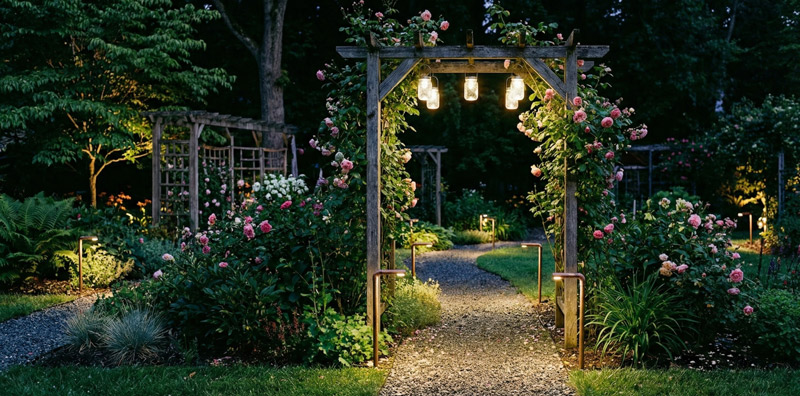
Mounting options include: setting jars on flat stones along a path, partially sinking them into gravel for stability, or hanging them with wire handles. Lanterns can be easily attached to hooks, brackets, or other fixtures for secure installation. If hanging, ensure the solar panel still sees sun; otherwise the jar may look great but never charge properly. The typical dimensions of a finished solar jar lantern are about 6 to 8 inches tall and 3 to 4 inches in diameter, making them easy to hang or attach in various outdoor spaces. These lanterns are not meant to light an entire walkway like an airport runway; they’re meant to create atmosphere with gentle, repeating points of light.
The solar module collects energy, which is stored in a rechargeable lithium-ion battery built into the solar light. Some solar jar lanterns include a switch to select between different lighting modes, such as dusk-to-dawn or timer-controlled settings, offering flexibility for your outdoor lighting needs. Solar garden lights come in various types, including motion-activated, dusk-to-dawn, and timer-controlled, so you can choose the best option for your space.
2) Low-voltage path lights from copper pipe (durable, modern, scalable)

If you want something that looks like a high-end landscape lighting set, build path lights using copper pipe as the body. Copper weathers beautifully and resists corrosion. The basic concept is: a vertical copper pipe stake, a cap or shade at the top, and a low-voltage LED module protected under the shade.
Use 12V landscape LED “puck” modules or MR16-style LED lamps designed for landscape lighting. The body can be made from 1/2” or 3/4” copper pipe. At the top, you can create a simple shade using a larger copper cap or a short wider pipe section as a “hat,” leaving an air gap so the LED doesn’t overheat and light can spread downward. For a glare-free path light, you want the light to bounce down and out, not directly into your eyes.
Cable routing is the part that differentiates “DIY” from “professional.” Plan a main cable path from the transformer, then branch off to each light with waterproof connectors made for low-voltage landscape wire. Avoid twisting wires and wrapping them in electrical tape; it fails outdoors. Use gel-filled, outdoor-rated connectors and create drip loops so water doesn’t run into junction points. You can hide wire under mulch, tuck it behind edging, or bury it shallowly if it’s rated for direct burial. Keep fixtures evenly spaced, and test brightness at night before final placement—spacing that looks right in daylight often feels too wide after dark.
When installing solar path lights, they are typically secured into the ground using stakes to ensure they remain stable and secure. Solar garden lights are available in a range of brightness levels, from dim light for ambiance to bright spotlights for security, and these are measured in lumens—ranging from as low as 5 lumens for soft ambiance to over 350 lumens for strong illumination. Consider the brightness level needed for your area when choosing solar lights, as different lights provide varying lumens. Some solar lights offer adjustable settings, allowing you to switch between bright and dim modes depending on your needs. Proper testing at night is important to confirm the desired brightness and coverage for your path or garden.
Copper fixtures are a longer build than jar lanterns, but the payoff is real: consistent brightness, better runtime, and a cohesive “designed” look. If you later expand your garden, you can add more fixtures by extending the low-voltage line.
3) Recycled can uplights for plant accents (focused, dramatic, budget-friendly)
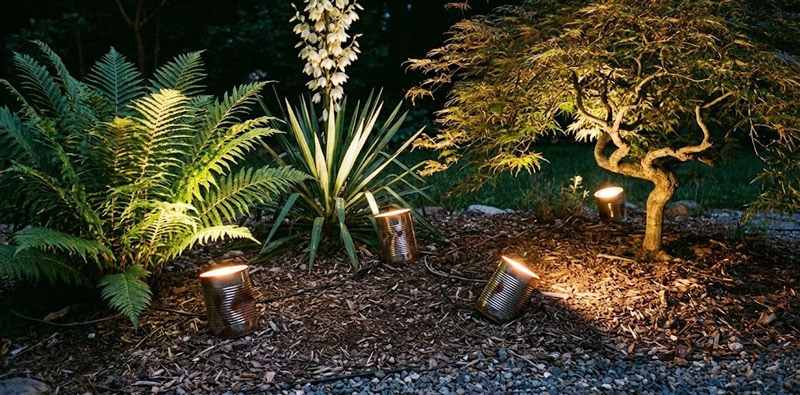
Accent lighting is what makes a garden feel dimensional at night. A few uplights aimed at ornamental grasses, small trees, or textured walls can look more dramatic than dozens of path lights. A creative DIY approach uses cleaned metal cans (or small metal containers) as housings for low-voltage LED spot modules or compact weatherproof LED lights.
The housing’s job is to protect the light and to control beam direction. Drill a drain hole at the lowest point so water can escape. Add a bracket or simple swivel mount inside so you can aim the light precisely. Paint the exterior with outdoor metal spray paint (matte black disappears into the landscape; dark green blends with foliage). To reduce glare, create a small front lip or hood so the LED source isn’t visible from normal viewing angles.
When choosing solar uplights, look for well-manufactured models that use high-quality materials for longevity. Opt for weatherproof solar lights with an IP65 or IP67 rating to ensure durability and reliable performance in all weather conditions. Some solar uplights also offer adjustable settings for beam direction and brightness, allowing you to customize your accent lighting. Remember to perform regular maintenance, such as cleaning the solar panels, to ensure optimal charging performance.
The professional trick with uplights is aim and restraint. Aim at a 30–60° angle to graze across foliage or bark texture, and avoid shining directly into windows or neighbor sightlines. Use fewer lights than you think you need. One well-aimed uplight can make a plant look sculptural; five poorly aimed lights can make your yard feel like a parking lot.
Execution guide (bullet-point section)

Planning (do this first)
Map your zones:
- Paths/steps = safety lighting
- Beds/trees = accent lighting
- Patio/seating = ambient lighting
Pick a power strategy:
- Solar: easiest install, variable brightness in winter/shade. For optimal charging, solar garden lights require a minimum of 6 hours of direct sunlight per day. Confirm your chosen locations receive enough sunlight by checking sun exposure during the day.
- 12V low-voltage: most reliable, expandable, “pro” look
- Battery/USB: best for small areas and temporary placement
- Note: If the solar panel receives at least six hours of full sunlight per day, the light should last all night. Most solar lights are designed to be maintenance-free and can remain on all night.
Choose a color temperature:
- Warm white (about 2700–3000K) looks natural in gardens and feels inviting
- Cooler whites can feel harsh on plants unless used sparingly for modern designs
Set a lighting goal:
- Safety: even, low glare, consistent spacing
- Mood: gentle pools of light, more shadow, less uniformity
- Highlighting: focused beams, deliberate aiming
Tools and materials (common list)
- Outdoor-rated silicone sealant (clear)
- Heat-shrink tubing (for low-voltage connections when appropriate)
- Waterproof low-voltage connectors (gel-filled preferred)
- Stainless screws/hardware (reduces rust streaks)
- For jar builds: jars, diffusion material, solar inserts or donor solar stakes
- For copper builds: copper pipe, caps/fittings, LED modules, 12V transformer, landscape wire
- For can uplights: metal cans, drain drill bit, paint, compact LED light, bracket
Weatherproofing rules that prevent 90% of failures
- Provide drainage for any fixture that can collect water (especially metal housings).
- Avoid trapping condensation: a small vent often beats fully sealing everything.
- Keep electronics elevated from the lowest point where water gathers.
- Use corrosion-resistant parts: stainless fasteners, copper/brass, outdoor-rated plastics. Choose weatherproof solar garden lights with IP65 or IP67 ratings for waterproof and dust-resistant performance, ensuring year-round durability.
- Don’t rely on tape outdoors; use proper connectors and sealants.
For installation, solar lights can be secured using screws and plugs for wall-mounted options, or simply stuck into the ground for stake-mounted lights. Always ensure all fixtures are securely fastened to prevent movement or damage from weather.
Build steps: solar jar lanterns (quick checklist)
- Clean and dry jar thoroughly (no residue).
- Add diffusion (frosting spray or translucent liner).
- Mount solar module at the top so the panel faces upward.
- Before sealing the jar, check that the switch is set to the desired mode and confirm the lighting settings (such as brightness or operational mode).
- Add a tiny vent hole near the top side + optional silica gel pack.
- Seal the lid lightly with silicone or a gasket; avoid full airtight sealing.
- Test charge in full sun for a day. The energy collected by the solar panel is stored in a rechargeable lithium-ion battery built into the solar light. After charging, perform testing at night to evaluate brightness and confirm the light operates as expected.
Build steps: 12V copper path lights (clean, scalable)
- Cut copper pipe to consistent heights for uniform appearance.
- Assemble top shade/hat so light is directed downward (glare control).
- Install an outdoor-rated 12V LED module inside the top assembly.
- Route landscape wire neatly; use waterproof connectors at each branch.
- Place fixtures temporarily, test at night, then finalize spacing and cable hiding.
- Label wire runs or keep a simple map for future maintenance.
Placement and aiming (what pros do)
- Path lights: place on alternating sides to avoid a “runway” effect; keep glare low. Solar lights installed along pathways, driveways, and stairs enhance safety and visibility for walking at night, especially during the evening hours. Well-placed solar lights provide reliable illumination for walking routes after sunset.
- Uplights: hide the fixture, reveal the plant; aim to graze textures and avoid hotspots.
- Layering: use fewer, better lights—let darkness exist as part of the design.
- Consistency: keep style consistent (same metal finish, similar brightness) for cohesion.
Maintenance schedule (simple but effective)
- Monthly: wipe solar panels, clear leaves/debris from fixtures.
- Seasonally: check connectors, tighten hardware, re-aim after plant growth.
- Annually: replace weak rechargeable batteries in solar modules; inspect seals and drainage.
Common mistakes and how to avoid them
Many DIY garden lights fail for predictable reasons: water pooling, poor wire connections, and unrealistic brightness expectations. Solar lights will never behave like wired landscape systems in deep shade or during short winter days; build with that reality in mind. While solar garden lights can charge on cloudy days, the battery charges more slowly compared to direct sunlight. To protect their batteries and electronics, it's best to store solar lights indoors during extreme winter weather. There's no need to worry about turning solar lights off manually, as most models operate automatically from dusk to dawn. Although the initial purchase of solar lights may be higher, they provide long-term savings by operating for several hours at night without ongoing electricity costs. Low-voltage systems, on the other hand, can last for years if you treat connections like the “core of the system” and use the right outdoor-rated connectors.
Also, resist the temptation to over-light. The most beautiful night gardens use contrast: pools of warm light, intentional shadows, and a few highlights that draw your eye. If you plan your zones, choose a reliable power method, and follow basic weatherproofing principles, you can produce DIY garden lighting that looks like it was installed by a professional—while still being customized to your space and your taste.
FAQs
How can I accurately judge whether a solar garden light is bright enough for real outdoor use?
Brightness should not be judged by lumen numbers alone.
Many solar lights advertise high lumen output that cannot be sustained due to limited panel size and battery capacity.
A more reliable measure is whether the light maintains usable illumination several hours after sunset, not just immediately after dark.
For paths and ambient garden lighting, consistent low-level light is usually more effective and visually pleasing than brief periods of intense brightness.
Why do many DIY garden lights work well the first year but fail later?
Most long-term failures are caused by moisture rather than electronic component quality.
Fully sealed fixtures often trap humid air, which condenses as temperatures change between day and night.
Over time, this internal moisture corrodes contacts and damages batteries.
Controlled weatherproofing—sealing critical entry points while allowing limited ventilation and drainage—greatly improves longevity.
Why do low-voltage path lights sometimes get dimmer farther from the transformer?
This effect is usually caused by voltage drop along the cable run.
As distance increases, resistance in the wire reduces available voltage, especially when thin cable or long series runs are used.
Using thicker landscape wire, shorter runs, or looped layouts helps maintain even brightness.
Testing the system at night before final installation is essential for professional results.
How important is color temperature consistency in garden lighting?
Color temperature strongly affects how natural and cohesive a garden appears at night.
Warm white light in the 2700–3000K range complements plants, stone, and wood.
Mixing warm and cool white lights often creates a disorganized and harsh visual effect.
Professionals typically choose one primary color temperature and control mood through placement and beam shaping rather than color changes.
Is it really necessary to design DIY garden lights for maintenance?
Yes. Maintenance-friendly design is one of the most important factors in long-term performance.
Batteries, LEDs, seals, and solar panels all degrade over time.
Fixtures that allow battery replacement, LED access, and panel cleaning without destruction last significantly longer.
Even minimal annual maintenance can greatly extend service life and reduce long-term cost.
